Bizcore System Setup – PDF Settings
You must configure the PDF settings in Bizcore according to your company’s needs. Follow these steps carefully to make sure all your PDF documents are formatted correctly.
Access the PDF Settings
1. Log in to your Bizcore admin account.
2. From the main dashboard, click Setup.
3. Select Settings from the dropdown list.
4. Under the Other section, click PDF.
You will find three sections here: General, Signature, and Document Formats.
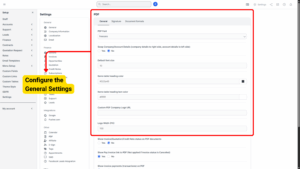
Configure the General Settings
In the General section, you can control the look and information displayed on your PDF documents:
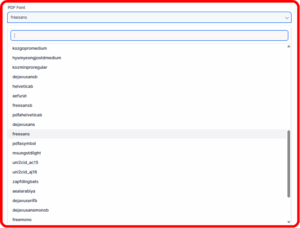
a) PDF Font:
Choose the font style that will be used for all your generated PDF documents.
b) Swap Company/Account Details (Company details to right side, account details to left side):
If you choose Yes, the company details will appear on the right side of the document and the client/account details on the left. If you choose No, the default layout will be used (company on left, client on right).
c) Default Font Size:
Set the default font size used throughout your PDFs. Example: 10 is a standard, professional size.
d) Items Table Heading Color:
Pick the background color for the headings in your items table. For example, #323a45 will give you a dark gray heading bar.
e) Items Table Heading Text Color:
Choose the color of the text in the heading row. For example, #ffffff will make the text white, which contrasts well with a dark heading bar.
f) Custom PDF Company Logo URL:
Enter the URL of a custom company logo if you want to use a different logo from the default one.
g) Logo Width (PX):
Set the width of the logo in pixels. Example: 150 makes your logo medium-sized and balanced on the page.
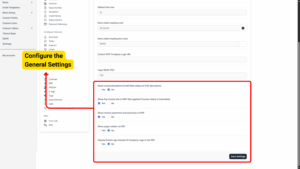
h) Show Invoice/Quotation/Credit Note Status on PDF Documents:
If set to Yes, the document status (e.g., Paid, Unpaid, Draft) will be shown on the PDF. If set to No, the status will not appear.
i) Show Pay Invoice Link on PDF:
Choose Yes if you want a clickable payment link to appear on invoice PDFs (unless the invoice is cancelled). Choose No to remove the link.
k) Show Invoice Payments (Transactions) on PDF:
If you choose Yes, any payments made toward the invoice will be listed on the PDF for full transparency. Choose No if you don’t want to show this payment history.
l) Show Page Number on PDF:
Choose Yes to display page numbers at the bottom of each page, which is useful for multi-page documents. Choose No if page numbering is not necessary.
m) Display Brand Logo Instead of Company Logo in the PDF:
If set to Yes, your brand logo will be displayed instead of the company logo. Choose No to keep the default company logo.
Configure the Signature Settings
In the Signature section, you can control where signatures appear on your documents:
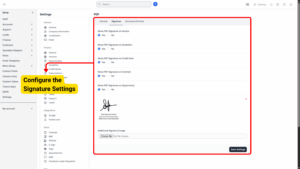
a) Show PDF Signature on Invoice:
If set to Yes, the saved signature will appear at the bottom of invoice PDFs. Choose No to hide it.
b) Show PDF Signature on Quotation:
Choose Yes to display the signature on quotation PDFs. Choose No to hide it.
c) Show PDF Signature on Credit Note:
If you choose Yes, the signature will appear on credit note PDFs. Choose No if not required.
d) Show PDF Signature on Contract:
Turn this to Yes if you want a signature to appear on contract PDFs. Select No to exclude it.
e) Show PDF Signature on Opportunity:
Choose Yes to display the signature on opportunity PDFs, or No to hide it.
f) Signature Image:
Upload your primary signature image file here.
g) Additional Signature Image:
You may upload an additional signature image if needed (for example, co-signed documents).
Configure the Document Formats
In the Document Formats section, you can choose the page layout for each type of document:
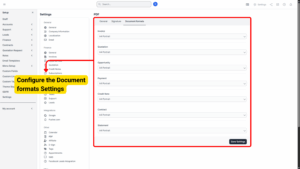
a) Invoice – Choose from A4 Portrait, A4 Landscape, Letter Portrait, or Letter Landscape.
b) Quotation – Choose the preferred format from the same four options.
c) Opportunity – Select the layout that works best for opportunity PDFs.
d) Payment – Pick a format for payment receipts.
e) Credit Note – Select the layout for credit note documents.
f) Contract – Choose how you want contracts to be displayed.
g) Statement – Choose the best format for account statements.
Save Your Settings
After completing all configurations:
1. Click Save Settings at the bottom of the page.
2. Generate a sample PDF (like an invoice) to confirm that everything appears exactly as you expect.