Bizcore Accounts Setup in Configure Features Guide
Access Setup
1. Log in to Bizcore with an admin account.
2. Go to the top navigation bar, click Setup.
3. Select Settings.
4. Under Configure Features, click Accounts.
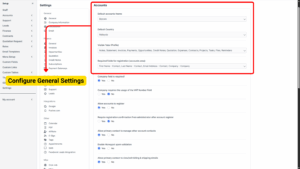
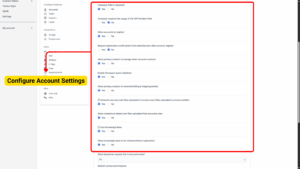
Configure General Settings
Here you will see several sections and options. Configure them as follows (based on your company policies):
a) Default Accounts Theme
– Choose the default theme style for the accounts area (this will affect how your customers see their portal).

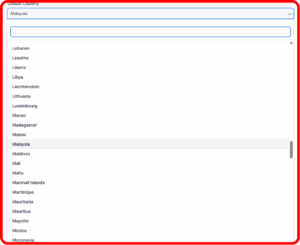
b) Default Country
– Select the main country where your business operates.
– This will be automatically applied to new accounts unless changed manually.
c) Manage Visible Tabs
– You can decide which tabs appear for customers in the accounts area.
Available tabs:
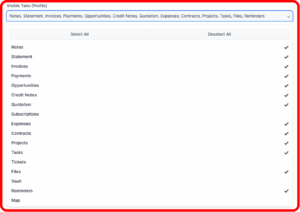
Tip
Only enable tabs that are relevant to your business

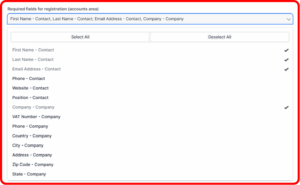
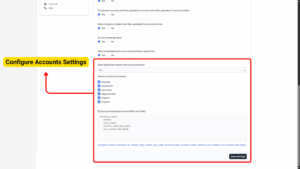
d) Configure Registration Fields
– Here, you set what information is required when a new account is registered.
– Available fields (toggle as required):
e) Company Field is Required?
Yes ➝ Choose this if every account must represent a company (B2B business). Example: If you only sell to registered businesses, you want this field mandatory.
No ➝ Choose this if you work with individuals (B2C), so “Company” can be left blank.
f) Company Requires the Usage of VAT Number Field
Yes ➝ If you must collect VAT numbers for tax compliance (common in EU or for business-to-business billing).
No ➝ If VAT is optional or you sell to consumers who may not have VAT numbers.
g) Allow Accounts to Register
Yes ➝ Enables self-registration for new accounts from your website. Best for businesses that allow customers to sign up freely.
No ➝ Disable self-registration. You will manually create accounts for customers. Good if you want full control over who has access.
h) Require Registration Confirmation from Administrator After Account Register
Yes ➝ All new registrations must be manually reviewed and approved by an admin before the account becomes active. Use this if you want to avoid fake or spam accounts.
No ➝ Accounts become active immediately after registration (automatic approval). Good for open signup systems where speed matters.
i) Allow Primary Contact to Manage Other Account Contacts
Yes ➝ The first/main contact (admin) for an account can add/edit/delete other contacts under the same account. Good for B2B where a company may have multiple team members accessing the account.
No ➝ Only system admins can manage contacts. Recommended if you want strict control over who can access the account.
j) Enable Honeypot Spam Validation
Yes ➝ Activates a hidden anti-spam field to catch bots. Recommended to reduce spam registrations.
No ➝ Disables this feature. Only choose No if you have another spam protection system in place.
k) Allow Primary Contact to View/Edit Billing & Shipping Details
Yes ➝ Lets customers manage their own billing/shipping addresses. Good for self-service and reducing admin work.
No ➝ Admins must update billing/shipping details manually. Good for strict compliance or controlled accounts.
l) Contacts See Only Own Files Uploaded in Account Area
Yes ➝ Each contact can only see files they personally uploaded. Recommended if you have multiple contacts under one company but want privacy between them.
No ➝ All contacts under the same account can see all files. Best when collaboration is encouraged.
m) Allow Contacts to Delete Own Files Uploaded from Accounts Area
Yes ➝ Contacts can remove files they uploaded (useful if they uploaded the wrong file).
No ➝ Only admins can delete files. Good if you want to keep an audit trail of everything uploaded.
n) Use Knowledge Base
Yes ➝ Turns on the Knowledge Base feature so customers can access articles and help resources.
No ➝ Hides Knowledge Base completely.
o) Allow Knowledge Base to Be Viewed Without Registration
Yes ➝ Makes your Knowledge Base public. Good for SEO and allowing anyone to find solutions without logging in.
No ➝ Only logged-in customers can view Knowledge Base articles. Good if information is private (like internal documentation).
p) Show Quotation Request Link in Accounts Area
Yes ➝ Displays a button/link for customers to request quotations directly from their portal. Good if you accept quote requests.
No ➝ Hides this option. Choose this if you don’t offer quotes or want customers to contact you manually for pricing.
q) Quotation Request Link
– Enable if you want customers to request a quotation directly from their account area.
r) Default Contact Permissions
Choose what a contact can see/do by default:
– Invoices
– Quotations
– Contracts
– Opportunities
– Support
– Projects
s) Account Information Format
Define how account information appears in PDF/HTML outputs.
Info
For invoices, Quotation, Payments, Statement
Save Your Settings
Once all gateways have been configured:
1. Review all the information setup.
2. Scroll down and click Save Settings.
3. Bizcore will confirm that your account settings are successfully updated.