Bizcore System Setup Calendar Settings
In Bizcore, you must configure the system based on your company’s needs. Follow these steps carefully to ensure proper setup:
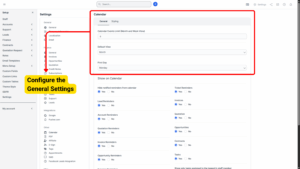
Access the Setup Menu
1. Log in to your Bizcore admin account.
2. From the main dashboard, click Setup in the top menu.
3. Select Settings from the dropdown list.
4. Under the Other section, click Calendar.
Configure the General Settings
The General tab contains two main sections: General and Styling.
General Section
Here’s how to configure each option:
a) Calendar Events Limit (Month and Week View):
This sets the maximum number of events shown per day in the calendar view. If you set it to 4, only four events will be displayed before a “+ More” link appears.
b) Default View:
Choose whether the calendar should open in Day, Week, or Month view by default.
c) First Day:
Select which day of the week the calendar should start on. Many companies choose Monday, but you can change it to Sunday or any other day.
d) Hide Notified Reminders from Calendar:
If set to Yes, reminders that have already been shown will be hidden from the calendar to avoid clutter. If set to No, all reminders will stay visible even after being notified.
e) Lead Reminders:
Choose Yes if you want reminders related to leads to be shown on the calendar. Choose No to hide them.
f) Account Reminders:
Choose Yes to show customer or account-related reminders on the calendar, or No to hide them.
g) Quotation Reminders:
Set to Yes if you want to display quotation follow-up reminders on the calendar. Set to No if you don’t want them visible.
h) Invoice Reminders:
Turn this to Yes if you want invoice due dates or payment reminders to appear on the calendar. Select No to hide them.
i) Opportunity Reminders:
Choose Yes to see reminders for opportunities and follow-up actions. Select No to keep the calendar clear of these reminders.
j) Expense Reminders:
Switch to Yes if you want to display expense-related reminders (like recurring expenses). Choose No to hide them.
k) Task Reminders:
Turn to Yes to show reminders for tasks on the calendar, or No to hide them.
l) Credit Note Reminders:
Set this to Yes to show reminders related to credit notes on the calendar. Choose No if not needed.
m) Ticket Reminders:
Choose Yes if you want support ticket reminders to appear on the calendar. Select No to hide them.
n) Invoices:
Select Yes to show invoice due dates and related events on the calendar, or No to exclude them.
o) Quotation:
Choose Yes to show quotation due dates or follow-up dates, or No to hide them.
p) Opportunities:
Select Yes if you want opportunities and their timelines to be visible on the calendar. Choose No if you don’t need them displayed.
q) Contracts:
Turn this to Yes to display contract start and end dates on the calendar, or No to hide them.
r) Tasks:
Choose Yes to show tasks on the calendar. Choose No to completely hide all tasks.
s) Show only tasks assigned to the logged-in staff member:
If set to Yes, staff will only see their own tasks on the calendar. If set to No, all tasks from all team members will be visible.
t) Projects:
Choose Yes to display project dates and milestones on the calendar. Choose No to hide them.
Configure the Styling Settings
Switch to the Styling section to define the colors used in your calendar and modules. This makes it easier to quickly identify each type of record visually.
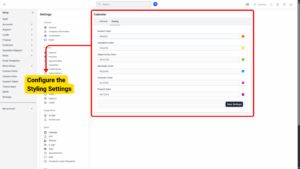
a) Invoice Color: #ff6f00
b) Quotation Color: #f4e618
c) Opportunity Color: #84c529
d) Reminder Color: #03a9f4
e) Contract Color: #c147d0
f) Project Color: #b72974
(Tip: You may adjust these colors to match your company branding or preferred color scheme.)
Save Your Settings
Once all configurations are complete, click Save Settings to apply your changes. Refresh the calendar to confirm that your preferences and colors are displayed correctly.