Bizcore Facebook Leads Integration – Full Setup Guide
In Bizcore, you must configure the system according to your company needs.
To enable Facebook Leads Integration, follow these steps:
Navigate to Facebook Leads Integration Settings
1. Go to the Bizcore dashboard.
2. From the main menu, click Setup.
3. Click Settings.
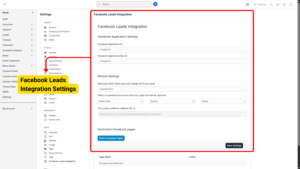
4. Under the Other section, click Facebook Leads Integration.
You will see two main sections: Facebook Application Settings and Module Settings, followed by a unique Webhook URL.
Configure Facebook Application Settings
This section allows Bizcore to communicate with Facebook securely. You will need to create a Facebook App first (if you don’t already have one).
Creating a Facebook App (on Facebook Developer Portal)
1. Go to https://developers.facebook.com.
2. Log in with your Facebook account.
3. Click My Apps (top-right corner), then click Create App.
4. Choose Business as the app type (recommended for lead ads).
5. Enter:
– App Name – A name for your app (e.g., “Bizcore CRM Leads”).
– Contact Email – Your business email.
6. Choose the Business Account (if available).
7. Click Create App and verify with your Facebook password.
Once created, Facebook will give you:
App ID – This is a unique number identifying your app.
App Secret – This is a secret key used to connect securely.
8. Copy these values and paste them into Bizcore:
Facebook Application ID → paste your App ID.
Facebook Application Secret → paste your App Secret.
Configure Module Settings
This section allows you to decide how leads from Facebook will be handled inside Bizcore.
Webhook Verify Token
– This is used to verify that incoming requests are from Facebook and not a malicious source.
– Bizcore provides a default value: token654321.
– You can leave it as is or set a custom token (e.g., mysecuretoken123) for better security.
– The token you choose here must match the token you set in Facebook when adding the webhook.
Assign Operator/Source/Status
– Operator (Staff Assignment) – Choose which staff member or sales representative should be responsible for leads captured from Facebook.
– Source – Select the lead source (usually “Facebook” or “Facebook Ads”) to easily track where the lead came from.
– Status – Choose the default lead status, such as “New,” “Pending,” or “In Progress,” so your sales pipeline stays organized.
This ensures that every lead captured will automatically have a responsible staff member, a source tag, and a status — saving time and avoiding confusion later.
Get Your Unique Webhook Callback URL
At the bottom of the page, you will see your unique webhook callback URL:
This URL is extremely important — it tells Facebook where to send the lead data when someone submits a lead form.
Copy this URL, as you will need it in the next step when setting up your Facebook App.
Connect Bizcore with Facebook (Webhook Setup)
-
Go back to your Facebook Developer Dashboard for the app you created earlier.
-
In the left menu, click Add Product → Select Webhooks → Click Set Up.
-
Choose Page as the object type (since lead ads are tied to a Facebook Page).
-
Click Subscribe to this Object.
-
Paste the Webhook Callback URL from Bizcore into the Callback URL field.
-
Enter the Verify Token you used in Bizcore (must match exactly).
-
Click Verify and Save.
If successful, Facebook will now send a verification request to Bizcore, and Bizcore will confirm it using the token you provided.
Save Settings
Once you have configured all the fields and options:
1. Review your entries to ensure accuracy.
2. Scroll to the bottom of the page.
3. Click the Save Settings button.
4. Bizcore will confirm that your Facebook Leads Integration configuration has been successfully saved.