Bizcore Support Setup Guide
Access Support Settings
1. Log in as an admin.
2. Go to Setup → Settings.
3. Under Configure Features, click Support.
4. You will see 3 main sections:
– General
– Email Piping
– Ticket Form
General Settings
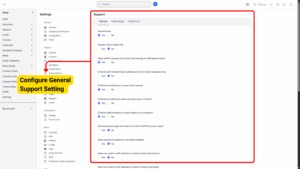
a) Use Services
Yes ➝ Enables “Services” field in tickets so customers can choose a service (e.g., Sales, IT Support, Warranty). Good for categorizing tickets.
No ➝ Services dropdown is hidden. Good for small teams with a single support department.
b) Disable Ticket Public URL
Yes ➝ Prevents tickets from being accessed via public link (extra privacy).
No ➝ Keeps public URL active. Good if you allow external users (without login) to track their ticket status.
c) Allow Staff to Access Only Tickets That Belong to Staff Departments
Yes ➝ Staff can only see tickets assigned to their department(s). Good for privacy and department-specific workflows.
No ➝ Staff can see all tickets across all departments. Good for small companies where everyone collaborates.
d) Send Staff-Related Ticket Notifications to the Ticket Assignee Only
Yes ➝ Only the assigned staff gets notifications (not the whole department). Reduces email clutter.
No ➝ Everyone in the department receives notifications. Good for teamwork when multiple people may handle tickets.
Info
If this option set to Yes and the ticket does not have an assignee, notification will be sent to all staff that belongs to the ticket department.
e) Receive Notification on New Ticket Opened
Yes ➝ Staff/admins receive an alert when a new ticket is created. Recommended for quick response.
No ➝ No notification is sent. Use this only if you manually check the dashboard frequently.
Info
All staff members which belong to the ticket department will receive notification that new ticket is opened.
f) Receive Notification When Account Reply to a Ticket
Yes ➝ Staff receive alerts when the customer replies. Good for SLA compliance and faster response.
No ➝ No notifications are sent; staff must check manually.
Info
All staff members which belong to the ticket department will receive notification when account reply to a ticket.
g) Allow Staff Members to Open Tickets to All Contacts
Yes ➝ Staff can open a ticket for any contact (even if they are not the primary contact).
No ➝ Staff can only open tickets for primary contacts.
Info
If staff member don’t have permission for accounts VIEW only will be able to create new tickets from admin area to account contacts where is assigned as account admin.
h) Automatically Assign the Ticket to the First Staff That Posts a Reply
Yes ➝ Whoever replies first becomes the ticket assignee. Great for distributed support teams.
No ➝ Ticket must be manually assigned. Recommended if you have a triage process.
i) Allow Access to Tickets for Non-Staff Members
Yes ➝ Enables ticket viewing for users without staff accounts (e.g., contractors or partners).
No ➝ Only staff can access tickets internally.
j) Allow Non-Admin Staff Members to Delete Ticket Attachments
Yes ➝ Non-admins can delete attachments. Good if they need to remove sensitive files.
No ➝ Only admins can delete attachments. Good for audit trail and security.
k) Allow Non-Admin Staff Members to Delete Tickets and Replies
Yes ➝ Staff can delete tickets and replies. Use carefully — this can erase history.
No ➝ Only admins can delete tickets/replies. Recommended for most businesses.
l) Allow Account to Change Ticket Status from Accounts Area
Yes ➝ Customers can mark tickets as closed, reopened, etc. Good for self-service.
No ➝ Only staff can change status. Good if you want to fully control ticket lifecycle.
m) In Accounts Area Only Show Tickets Related to the Logged-In Contact
Yes ➝ Each contact only sees their own tickets (except the primary contact who sees all). Good for privacy when multiple contacts exist.
No ➝ All contacts can see all tickets for that account. Good for collaboration within a company.
n) Ticket Replies Order
Ascending ➝ Oldest reply at top (chronological order).
Descending ➝ Latest reply at top (most recent first).
Info
The initial ticket message will be always shown as first.
0) Enable Support Menu Item Badge
Yes ➝ Shows a badge counter for open/unread tickets in the menu. Good for quick visibility.
No ➝ Hides the badge counter.
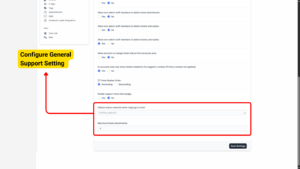
p) Default Status Selected When Replying to Ticket
Choose which status is auto-selected after replying (e.g., In Progress, Answered, Waiting Reply).
q) Maximum Ticket Attachments
Set the number of files customers/staff can attach per ticket.
Email Piping
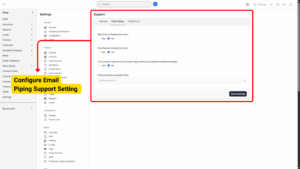
a) Pipe Only on Registered Users
Yes ➝ Only registered users’ emails are converted into tickets. Good for spam control.
No ➝ Any email creates a ticket (may lead to spam if public-facing email address is used).
b) Only Replies Allowed by Email
Yes ➝ Prevents new tickets from being created via email. Only existing tickets can be replied to by email.
No ➝ Allows new tickets to be created from incoming emails.
c) Try to Import Only the Actual Ticket Reply (Without Quoted/Forwarded Message)
Yes ➝ Automatically cleans up email replies to keep tickets neat. Recommended.
No ➝ Full email is kept, including quoted text.
d) Default Priority on Piped Ticket
Set the default priority for tickets created by email (Low, Medium, High).
Ticket Form
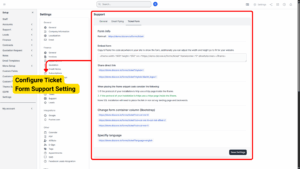
a) Form URL:
Copy the form URL (e.g., https://demo.bizcore.io/forms/ticket) to share directly.
b) Embed Form:
Copy and paste the <iframe> code to your website to show the form directly. You can adjust width and height.
c) Share Direct Link:
Use https://demo.bizcore.io/forms/ticket?styled=1&with_logo=1 for a styled link with your logo.
d) Column Layout:
Add ?col=col-md-8 or other Bootstrap classes to adjust the form size and alignment.
e) Specify Language:
Append &lang=en (or other language code) to force a language for the form.
Save Your Settings
Once all gateways have been configured:
1. Review all credentials, fees, and toggles carefully.
2. Scroll down and click Save Settings.
3. Bizcore will confirm that your payment gateway settings are successfully updated.