Invoice Setup Guide
This section of the Bizcore documentation will guide you through the Invoice Setup process in a detailed, step-by-step manner. Configuring invoices correctly is critical for maintaining proper financial records, ensuring compliance with accounting standards, and presenting a professional image to your clients.
Accessing the Invoice Settings
1. Log in to your Bizcore admin dashboard.
2. Click Setup in the navigation menu.
3. Select Settings from the dropdown.
4. Under the Finance category, click Invoices.
You will now see the Invoice Settings page with multiple options to configure numbering, visibility, and layout preferences.

Configuring Invoice Numbering
Invoice numbering is crucial for financial tracking, compliance, and audit purposes.
a) Invoice Number Prefix
– Enter a prefix to be displayed before every invoice number.
– Example: INV- will result in invoice numbers like INV-000001.
– You can include letters, symbols, or leave it blank for simple numbers.
b) Next Invoice Number
– Set the starting number for the next invoice.
– Example: If you enter 105, the next invoice will be INV-000105.
– Use this option if you are migrating from another system and want to continue your numbering sequence.
Info
Set this field to 1 if you want to start from the beginning.
c) Invoice Due After (days)
– Define how many days after the invoice date payment will be due.
– Example: Entering 14 means invoices will have a default due date 14 days from the issue date.
– Recommended to match your company’s payment terms policy.
Info
Set zero to avoid calculation.
Setting Invoice Permissions & Visibility
These options control who can view invoices, when they can be deleted, and what information is shown.
a) Allow Staff Members to View Invoices Where They Are Assigned To
– Tick Yes to allow staff to view invoices they are assigned to (e.g., sales agent or project owner).
– Useful for tracking individual performance and enabling collaboration.
b) Require Client to Be Logged In to View Invoice
– Tick Yes if you want to restrict invoice access to clients who are logged in to the client portal.
– Ensures security and privacy of client data.
c) Delete Invoice Allowed Only on Last Invoice
– Tick Yes to allow deletion of only the most recent invoice.
– Prevents gaps in your invoice numbering sequence for accounting compliance.
d) Decrement Invoice Number on Delete
– Tick Yes if you want the system to reuse the deleted invoice number.
– Recommended if you want a strictly continuous numbering system without skipped numbers.
Info
Do you want the invoice number to go back one step when you delete the last invoice?
– If you set this to Yes:
Example: If the next invoice number is 15 and you delete the last invoice, the next invoice number will go back to 14.– If you set this to No:
The next invoice number will stay at 15, even if you delete the last invoice.
Tip
If you have disabled the option to delete only the last invoice, it’s better to set this to No so your invoice numbers don’t change unexpectedly.

e) Exclude Invoices with Draft Status from Accounts Area
– Tick Yes if you want draft invoices to remain hidden from the accounts section until finalized.
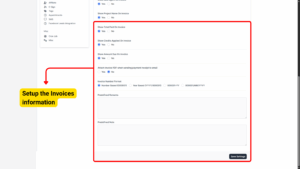
Configuring Invoice Display Options
These settings determine what information appears on your invoices.
a) Show Sale Agent on Invoice
– Displays the name of the assigned sales agent.
b) Show Project Name on Invoice
– Displays the related project name if applicable.
c) Show Total Paid on Invoice
– Shows the total amount that has been paid so far.
d) Show Credits Applied on Invoice
– Displays any credit notes applied to the invoice.
e) Show Amount Due on Invoice
– Shows the remaining amount that the client still needs to pay.
f) Attach Invoice PDF When Sending Payment Receipt to Email
– Tick Yes to automatically attach a PDF copy of the invoice whenever a payment receipt email is sent to the client.
These options improve transparency and reduce back-and-forth communication with clients about amounts, credits, and remaining balances.
Choosing Invoice Number Format
Select the format that best suits your company’s accounting style:
– Number Based: 000001 (simple sequential numbering).
– Year Based: YYYY/000001 (includes the year, resets every year).
– Year Suffix: 000001-YY (number followed by last two digits of the year).
– Date Based: 000001/MM/YYYY (includes both month and year in the number).
Adding Predefined Remarks and Notes
Predefined remarks and notes save time when creating invoices by allowing you to insert frequently used messages automatically.
a) Predefined Remarks
– Enter any standard remarks that should appear at the bottom of every invoice.
b) Predefined Note
– Add additional notes or disclaimers for clients.
Saving Your Invoice Settings
After configuring all fields:
1. Review all your selected settings carefully.
2. Scroll to the bottom of the page.
3. Click Save Settings.
4. You will receive a confirmation message indicating that your changes were saved successfully.