Finance General Setup Guide
This guide will walk you through the process of configuring the General Finance Settings in the Bizcore system to match your company’s financial policies and operational preferences.
Proper configuration ensures accurate invoices, quotations, tax calculations, and a consistent presentation of financial data across your business.
Accessing the General Finance Settings
1. Log in to your Bizcore account using your admin credentials.
2. On the main navigation bar, click Setup.
3. From the dropdown menu, select Settings.
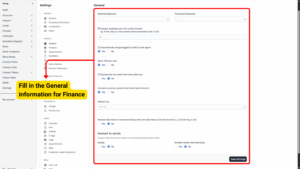
4. Under the Finance section, click General.
You will now see the General Finance Settings page, which contains multiple options related to number formatting, tax display, and document presentation.
Setting Number Formatting, Sales and Tax Display Options
Proper number formatting is important to ensure that your invoices, quotations, and reports are easily readable and compliant with your regional standards. These options control how taxes and sales agent information appear on invoices, quotations, and other financial documents.
a) Number Padding Zeros for Prefix Formats
– Define how many zeros will be automatically added to document numbers.
– Example: If padding is set to 3, your invoice numbers will appear as INV-001, INV-002, and so on.
Info
For Invoices, Quotation, and Opportunities
b) Automatically Assign Logged-in Staff as Sales Agent
– Tick Yes if you want the system to automatically tag the logged-in staff member as the sales agent when creating a new invoice, quotation, or sale record.
– This helps track sales performance without manually assigning an agent every time.
Info
Applicable for: Quotation, Invoices, and Opportunity
c) Show TAX per Item
– Tick Yes to display tax amounts for each individual item in the item table.
– Useful for businesses where customers need to see the tax applied to each product/service separately.
d) Remove the Tax Name from Item Table Row
– Tick Yes if you prefer to hide the tax label (e.g., “SST 8%”) from the item table and only display the total amount with tax applied.
– Recommended for businesses that want a cleaner invoice layout.
Info
eq. Item TAX 15% will be shown as 15% without the tax name (Not applied if multiple taxes with same name and tax percent found for item)
e) Exclude Currency Symbol from Items Table Amount
– Tick Yes to hide the currency symbol (e.g., RM, $, €) next to item prices in the item table.
– The currency can still be displayed in the document header or total amount section, preventing repetition.
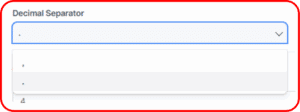
f) Decimal Separator
Select the symbol to separate decimal values.
– Common options: . (dot) or , (comma).
– Example: If you choose a dot, an amount will appear as 100.25. If you choose a comma, it will appear as 100,25.

g) Thousand Separator
Select the symbol for separating thousands in large numbers.
– Common options: , (comma), space, or . (dot).
– Example: 1,000.00 or 1.000,00.
h) Remove Decimals on Numbers/Money with Zero Decimals
– Tick Yes if you want numbers like 2.00 to display as 2.
– Numbers with non-zero decimals, such as 2.25, will remain unchanged.
– This setting is helpful for businesses that deal mostly in whole numbers or want to keep invoices cleaner.
Info – Configuring Default Tax
If your business applies a standard tax rate (e.g., 6% SST or VAT), you can set a default tax to automatically apply to new transactions.
– Refer to the support documentation titled “How to Setup and Add New Tax” to create or edit your default tax rate.
– Once created, select the default tax from the dropdown in this section to ensure it is applied automatically to all relevant documents.
– This reduces errors from forgetting to add tax manually.
Configuring Amount-to-Words Settings
The Amount-to-Words feature spells out the total amount in words, which can be a legal requirement in certain regions.
a) Enable Amount-to-Words
– Tick Yes to enable this feature.
– Example: RM 1,250.50 will be converted to “One Thousand Two Hundred Fifty Ringgit and Fifty Sen.”
b) Number Words into Lowercase
– Tick Yes to convert the amount words into lowercase (e.g., “one thousand two hundred…” instead of “One Thousand Two Hundred…”).
– Choose according to your company’s preferred document format.
Once you have configured all the fields according to your company’s requirements:
1. Review all selected options carefully.
2. Click Save Settings at the bottom of the page.
3. The system will confirm that your changes have been successfully applied.