Email Setup
Configuring email in Bizcore is a critical step to ensure smooth communication between your business and your clients. The Email Settings allow you to define how the system sends notifications, invoices, quotations, reminders, and other communications.
The Email configuration is divided into two main sections:
1. SMTP Settings – to set up the main email server and connection details.
2. Email Queue Settings – to control how outgoing emails are processed and managed by the system.
By completing this setup, you ensure that all outgoing messages are delivered reliably and professionally, with your company’s branding applied consistently.
Accessing the Email Settings Page
To configure email:
1. From the main Bizcore dashboard, click Setup.
2. Select Settings from the dropdown menu.
3. Click Email to open the localization configuration page.
SMTP Settings
The SMTP Settings section is where you configure the main email delivery method for the entire system. This setup is essential to make sure that emails such as invoices, quotations, password resets, and notifications are sent reliably and securely.
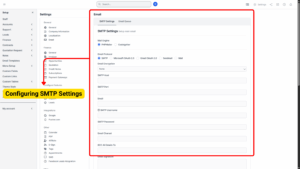
a) Select Mail Engine
Choose the mail engine that your system will use to send emails.
Available options:
PHPMailer – Recommended for most installations as it is widely supported.
CodeIgniter – May be used if you prefer using the framework’s built-in mail function.
b) SMTP – Standard and most commonly used option for reliable email delivery.
c) Microsoft OAuth 2.0 – Use this if you are connecting with Microsoft 365 or Outlook with OAuth authentication.
d) Gmail OAuth 2.0 – Select this if you will use Gmail or Google Workspace with OAuth authentication.
e) Sendmail – Uses the server’s built-in sendmail function.
f) Mail – A basic PHP mail function (not recommended for production use due to deliverability issues).
g) Set Email Encryption
Choose the type of encryption for secure email transmission:
None – No encryption, use only for testing on a local server.
SSL – Secure Sockets Layer encryption.
TLS – Transport Layer Security encryption (recommended for most mail providers).
h) SMTP Host: Enter the hostname or IP address of your email server (e.g., smtp.yourdomain.com).
i) SMTP Port: Enter the port number used for SMTP communication (commonly 465 for SSL or 587 for TLS).
j) Email Address: Provide the default “From” email address that the system will use.
k) SMTP Username: Enter the username used to authenticate with your SMTP server.
l) SMTP Password: Enter the password for your SMTP account (keep it secure).
m) Email Charset: Specify the character set (e.g., UTF-8) to ensure proper display of special characters.
n) BCC All Emails To: Enter an email address to receive blind copies of all outgoing emails for record-keeping.
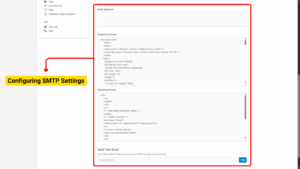
o) Email Signature: Add a default signature that will appear at the bottom of all outgoing emails.
p) Predefined Header: Insert a custom header message or HTML code to brand your emails consistently.
q) Predefined Footer: Add a footer message, such as legal disclaimers or company information.
r) Send a Test Email
1. Click the Send Test Email button to verify that your SMTP configuration is working correctly.
2. If the test email is successfully delivered, this means your SMTP setup is functioning.
s) Save SMTP Settings
Once you have confirmed that the configuration is correct, click Save Settings to apply the changes.