Quotation Setup Guide
To configure Quotations properly in Bizcore according to your company’s requirements, follow the steps below carefully:
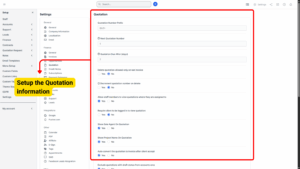
Navigate to Quotation Settings
1. Log in to your Bizcore System using your administrator credentials.
2. Go to the Setup menu from the main dashboard.
3. Click on Settings.
4. Under the Finance section, select Quotation.
This will open the Quotation configuration page, where you can set up all related preferences.
Configure Basic Quotation Settings
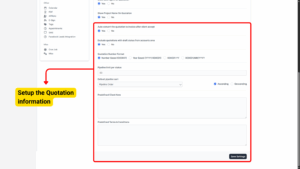
On the Quotation settings page, you will find several options that control the numbering format, visibility, and automation behavior for quotations.
Quotation Number Prefix
– Enter a custom prefix for your quotations (e.g., QTN-, QUO-, or your company code).
– This helps in easily identifying quotation documents and differentiating them from invoices or opportunities.
Next Quotation Number
– Specify the next sequential number to be used for quotations.
– This is useful if you are migrating from another system and want to continue the numbering from where you left off.
Info
Set this field to 1 if you want to start from the beginning.
Quotation Due After (Days)
– Enter the number of days after which a quotation will expire if not accepted by the client.
– Example: If you set it to 14 days, all new quotations will automatically have a due date 14 days from the issue date.
Info
Set zero to avoid calculation.
Access Control and Automation Options
You will find several toggle options that allow you to control visibility, permissions, and automatic conversion of quotations.
a) Delete Quotation Allowed Only on Last Quotation
– If enabled (Yes), users can only delete the most recent quotation to maintain proper numbering sequence and record integrity.
b) Decrement Quotation Number on Delete
– If enabled (Yes), the quotation number will decrease automatically if the last quotation is deleted, keeping the numbering consistent.
Info
Do you want the quotation number to go back one step when you delete the last quotation?
– If you set this to Yes:
Example: If the next quotation number is 15 and you delete the last quotation, the next quotation number will go back to 14.– If you set this to No:
The next quotation number will stay at 15, even if you delete the last quotation.
Tip
If you have disabled the option to delete only the last quotation, it’s better to set this to No so your quotation numbers don’t change unexpectedly.

c) Allow Staff Members to View Quotations Where They Are Assigned To
– When enabled, staff members assigned to a particular quotation can view it, improving collaboration and communication.
d) Require Client to Be Logged In to View Quotation
– If enabled, clients must log into their portal to access their quotations, adding a security layer.
e) Show Sale Agent on Quotation
– Displays the name of the sales agent assigned to the quotation on the document itself.
f) Show Project Name on Quotation
– Includes the related project’s name on the quotation for better context.
g) Auto Convert Quotation to Invoice After Client Accept
– Automatically converts the quotation into an invoice once the client accepts it, streamlining the billing process.
h) Exclude Quotations with Draft Status from Accounts Area
– Prevents draft quotations from appearing in financial reports, ensuring only confirmed quotations are considered in accounts.
i) Set Quotation Number Format
– Choose how your quotation numbers will be formatted. The available options include:
Number Based (000001) – Simple sequential numbering (e.g., 000001, 000002).
Year Based (YYYY/000001) – Adds the current year as a prefix (e.g., 2025/000001).
000001-YY – Appends the two-digit year after the number (e.g., 000001-25).
000001/MM/YYYY – Includes month and year in the number (e.g., 000001/09/2025).
– Select the format that aligns with your internal documentation standards.
j) Pipeline Limit Per Status
– Set a maximum number of quotations allowed per status to maintain workflow efficiency.
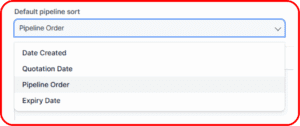
k) Default Pipeline Sort
– Choose how quotations should be sorted in the pipeline view:
Date Created – Sort by the date the quotation was created.
Opportunity Date – Sort based on the related opportunity date.
Pipeline Order – Custom order defined by your workflow.
Open Till – Sort by the quotation expiry date.
Add Predefined Notes
You can save time by setting up default messages that will appear on every quotation:
a) Predefined Client Note
– Add a note or message that will be automatically displayed on all quotations (e.g., “Thank you for considering our services.”).
b) Predefined Terms & Conditions
– Enter standard terms and conditions that will apply to all quotations, such as payment terms, validity, and cancellation policies.
Save Settings
Once all configurations have been set:
1. Review your selections carefully.
2. Click on the Save Settings button at the bottom of the page.
3. Bizcore will confirm that your quotation settings have been successfully saved and applied.