Bizcore Appointment Setup Guide
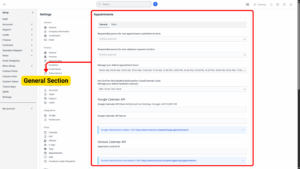
Navigate to Appointment Settings
1. Log in to your Bizcore Admin Dashboard.
2. Go to Setup → Settings.
3. Under the Other category, click Appointments.
4. You will see two sections:
– General
– Form
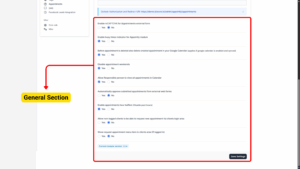
Configure the General Section
The General Section controls how appointments behave across the system and how staff and clients interact with them.
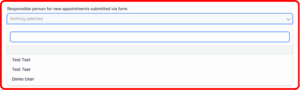
a) Responsible Person for New Appointments
Purpose: Determines which staff member will automatically be assigned to new appointments submitted through the external appointment form.
Best Practice: Assign this to a staff member responsible for scheduling or client relations.
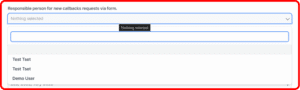
b) Responsible Person for Callback Requests
Purpose: Defines who will receive notifications and handle callback requests from clients.
Best Practice: Assign to someone who can quickly respond to callbacks.
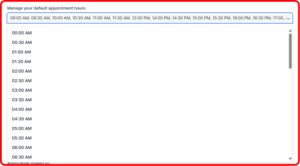
c) Manage Your Default Appointment Hours
Purpose: Sets the available hours for appointments (e.g., 09:00 AM – 17:00 PM).
Recommendation: Match with your business operating hours and block out lunch breaks if necessary.
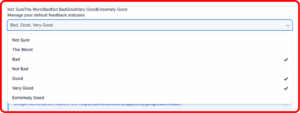
d) Manage Your Default Feedback Statuses
Purpose: Allows you to define the rating options for client feedback after an appointment.
Best Practice: Keep it simple (3–5 options) for easy client participation.
e) Google Calendar API Integration
Steps to Configure:
1. Obtain your Google API Client ID and Google API Secret from Settings → Google → API CLIENT ID.
2. Enter them into the fields provided in Bizcore.
3. Use the Google Authorization Redirect URI displayed in Bizcore to allow secure syncing.
4. Your appointments in Bizcore will sync automatically with your Google Calendar, keeping schedules aligned.
f) Outlook Calendar API Integration
Steps to Configure:
1. Obtain your Application (Client) ID from the Outlook Developer Portal.
2. Enter it into Bizcore along with the provided Outlook Authorization and Redirect URI.
3. Bizcore appointments will sync with Outlook Calendar.
g) Enable reCAPTCHA for External Forms
Yes: Adds Google reCAPTCHA to appointment forms, blocking spam and automated submissions.
No: No protection — faster form submissions but higher spam risk.
Keep this enabled for security.
h) Enable Busy Times Indicator
Yes: Prevents clients from booking appointments that conflict with existing bookings.
No: Clients can still select already-booked slots (risk of double booking).
Always enable this for better scheduling control.
i) Delete from Google Calendar When Appointment is Deleted
Yes: Automatically removes the synced Google Calendar event when appointment is deleted in Bizcore.
No: Deletes only in Bizcore, leaving the Google Calendar event intact.
Enable this to keep both calendars consistent.
j) Disable Appointment Weekends
Yes: Prevents booking on Saturdays and Sundays.
No: Allows weekend bookings.
k) Allow Responsible Person to View All Appointments
Yes: Grants full visibility to the responsible person for all appointments across the system.
No: They will only see their assigned appointments.
Enable for managers or supervisors who need an overview of the team’s schedule.
l) Automatically Approve Submitted Appointments
Yes: All external appointment requests are auto-approved and added to the calendar.
No: Staff must manually review and approve them.
Enable if you want a smooth and fast booking experience for clients. Disable if you require manual vetting.
m) Enable Appointment Hour Buffers
Yes: Prevents booking of past time slots, ensuring clients can only book for future times.
No: Clients can still request past times (not recommended).
Keep this enabled for better control.
n) Allow Non-Logged Clients to Request Appointments
Yes: Anyone can request an appointment without needing a client account.
No: Only registered and logged-in clients can book.
Enable for lead generation, disable if you only want existing customers booking.
o) Show Request Appointment Menu in Client Area
Yes: Adds a “Request Appointment” menu item in the client portal.
No: Clients will not see this option.
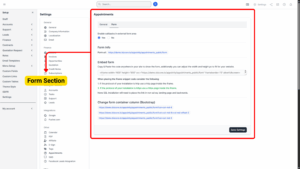
Configure the Form Section
The Form Section customizes how the external appointment form behaves and appears.
a) Enable Callbacks in External Form
Yes: Adds a checkbox or option for clients to request a callback.
No: Removes this feature from the form.
b) Form Info
Form URL:
– Direct link to your appointment form — share this with clients or embed on your site.
Embed Form:
1. Copy the iframe code provided.
2. Place it on your website where you want the appointment form to appear.
3. Adjust width and height to match your layout.
4. Use HTTPS if your website uses HTTPS to avoid security warnings.
5. Use ?col=col-md-8 or other parameters to control column width (for Bootstrap layouts).