Bizcore System Setup – Affiliate Settings
In Bizcore, you can set up an affiliate program to allow users to promote your services and earn rewards. Follow these steps to configure it properly:
Access the Affiliate Settings
1. Log in to your Bizcore admin account.
2. From the main dashboard, click Setup.
3. Select Settings from the dropdown list.
4. Under the Other section, click Affiliate.
This section contains all the options for configuring your affiliate program.
Configure the Affiliate Options
Here’s what each setting does and how to choose between Yes and No:
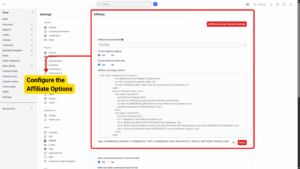
a) Affiliate Reward Model:
Choose the type of reward model your program will use (for example, fixed amount per referral or percentage commission). This determines how affiliates earn rewards.
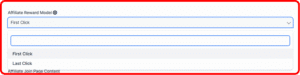
Info
Select model for rewarding affiliate referral commission. First click rewards initial engagement. Last click rewards final interaction.
b) Auto Approve Signup:
If you set this to Yes, anyone who signs up for the affiliate program will be approved automatically. If you set it to No, you will need to manually review and approve affiliate applications before they can start promoting your services.
Info
Enable to activate affiliate immediately after signup, otherwise, you will need to approve the affiliate from your admin panel.
c) Save Referral Client Info:
If you choose Yes, the system will save client information for each referral, making it easier to track who was referred by whom. If you select No, referral tracking will be more limited and client data will not be stored for affiliate reporting.
Info
When enable, the module collect and save the referred client IP address, user agent and other neccessary basic client info.
d) Affiliate Join Page Content:
This section allows you to customize the content that appears on the affiliate program signup page. You can use HTML to format the text and include elements like headings, paragraphs, and buttons. The provided example already includes a welcoming message, signup button, and referral program details.
e) Tags Available:
You can use placeholders like {COMMISSION_AMOUNT}, {COMMISSION_TYPE}, {COMMISSION_CAP}, {MIN_PAYOUT}, {PAYOUT_METHODS}, and {SIGNUP_LINK} to dynamically display values in your join page content.
f) Show Commissions Info on Referrals Table:
If set to Yes, the referral table will display detailed commission information for each referral, which helps affiliates see what they have earned. If set to No, the table will only show basic referral details without commission breakdowns.
g) Referrals Table Commission Date Format:
Choose the date format for showing commission dates (for example, DD/MM/YYYY or MM/DD/YYYY). This keeps your reports consistent with your preferred regional format.
h) Enable Removal of Referrals:
If set to Yes, admins can delete referrals. When a referral is deleted, all associated commissions are also deleted, but the affiliate’s overall balance will remain unchanged. If set to No, referrals cannot be removed, which keeps all referral history intact.
i) Allow Affiliates to Update Affiliate Slug ID:
Choose Yes if you want affiliates to be able to edit their own slug (unique part of their referral link). This can be useful for personalization. Choose No to lock their slug so it cannot be changed.
Configure Affiliate Earnings Gateway
At the bottom of the page, there is a button labeled Affiliate Earnings Gateway Settings.
– Click this button to set up how affiliates will be paid.
– This will take you to the Payment Gateway Settings, where you can choose the available payout methods (bank transfer, PayPal, etc.) and configure payment details.
Save Your Settings
Once you have completed all the configurations:
1. Click Save Settings to apply your changes.
2. Test your affiliate signup page to confirm that the content and referral tracking work as expected.