Opportunities Setup Guide
The Opportunities module in Bizcore is designed to help businesses manage potential sales leads, track their progress, and convert them into invoices or projects efficiently.
This guide explains how to configure the Opportunities Settings in detail, so your company can standardize opportunity tracking and streamline the sales workflow.
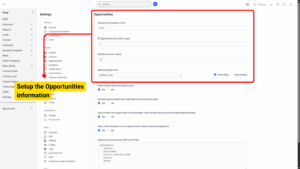
Accessing the Opportunity Settings
1. Log in to the Bizcore Admin Panel with your administrator account.
2. Navigate to Setup in the main menu.
3. Select Settings from the dropdown.
4. Under the Finance section, click Opportunities.
You will now see the Opportunities Settings page, where you can configure prefixes, due dates, pipelines, permissions, and display options.
Configuring Opportunities Numbering
a) Opportunities Number Prefix
– Adds a prefix to each opportunity number.
– Example: If you set the prefix to OPP-, your opportunities will appear as OPP-000001, OPP-000002, and so on.
b) Opportunity Due After (Days)
– Defines how many days after creation an opportunity is considered open before expiring or being marked as overdue.
– Example: Setting it to 30 means each opportunity will have an “Open Till” date 30 days after its creation date by default.
Info
Set zero to avoid calculation
c) Pipeline Limit per Status
– Sets a maximum number of opportunities that can be in each status column at one time.
– Prevents sales staff from hoarding too many leads in one stage and encourages timely follow-up and movement through the pipeline.
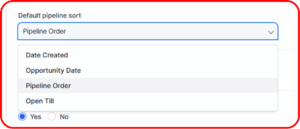
d) Default Pipeline Sort
– Determines how opportunities are sorted within the pipeline view.
– Options:
Date Created: Orders opportunities based on when they were added to the system.
Opportunity Date: Sorts based on the specified opportunity date (useful if you assign expected closing dates).
Pipeline Order: Maintains a custom order manually set by staff.
Open Till: Orders opportunities by their expiration date (earliest expiring shown first).
After selecting a sort method, choose Ascending (oldest to newest) or Descending (newest to oldest).
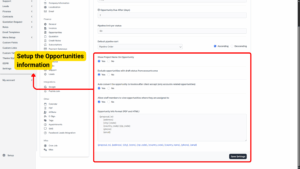
Opportunity Visibility and Automation
Bizcore offers several settings to control what information is displayed and how opportunities are handled when a client accepts them.
a) Show Project Name on Opportunity
Displays the associated project name on the opportunity view for better context.
b) Exclude Opportunities with Draft Status from Accounts Area
– Hides draft opportunities from the main accounts view to avoid clutter and inaccurate reporting.
c) Auto Convert the Opportunity to Invoice after Client Accept
– Automatically creates an invoice when the client accepts the opportunity.
– This is only applied to opportunities that are linked to accounts.
d) Allow Staff Members to View Opportunities Where They Are Assigned To
– Tick Yes to grant staff access to opportunities they are directly assigned to.
– Ensures sales agents and account managers can follow up on their leads without admin intervention.
Configuring Opportunity Info Format
Bizcore allows you to customize how opportunity information is presented in both PDF and HTML formats.
a) Opportunity Info Format (PDF):
– Choose how opportunities should be rendered when exported or sent as PDF files.
– You can include branding, tables, or specific details based on your company style guide.
b) Opportunity Info Format (HTML):
– Controls how opportunities appear in the web interface or email templates.
– Recommended to align the HTML layout with your company’s branding and make it client-friendly for easy reading.
Saving Your Opportunity Settings
After reviewing and configuring all fields:
1. Scroll to the bottom of the Opportunities Settings page.
2. Click Save Settings.
3. Bizcore will display a confirmation message that your settings have been applied successfully.