Vendor Registration Guide
📌 Overview
The Vendor Registration feature allows external vendors to register themselves through the Vendor Portal, streamlining the vendor onboarding process. By enabling this feature, your organization can allow vendors to independently submit their details for review, which can then be approved or rejected by the admin.
This functionality ensures a more efficient, transparent, and secure vendor management workflow. Once approved, vendors gain access to the portal and can participate in transactions such as submitting quotations, viewing purchase orders, and managing their information.
Step 1: Enable Vendor Registration Option
Before vendors can register themselves, the registration feature must be activated in the system settings.
1. Log in to the Admin Portal using administrator credentials.
2. Navigate to the Purchase module from the left sidebar.
3. Select the Settings menu.
4. Click on the Purchase Options tab.
5. Enable the checkbox “Allow vendors to register”.
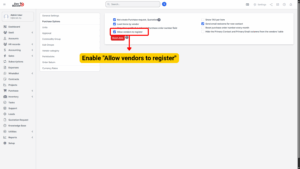
– Once enabled, the Vendor Portal will display a “Register” option.
– If disabled, vendor self-registration will not be accessible.
6. Click Save to apply the changes.
Tip
Only Admin users can enable or disable vendor self-registration. This ensures proper control over external access to the system.

Step 2: Vendor Registration via Vendor Portal
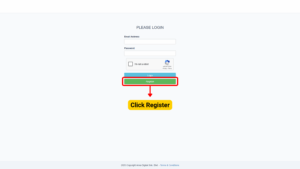
1. Go to the Vendor Portal URL:
2. Click on Register.
3. Fill in the required registration details:
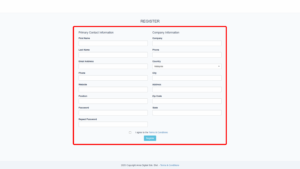
| Field Label | Description |
|---|---|
| Company Name | The official name of the vendor’s company or organization. |
| Vendor Code (if required) | A unique identification code assigned to each vendor for internal tracking purposes. |
| Contact Person Name | Name of the individual who serves as the main point of contact for the vendor. |
| Email Address | The primary email address used for communication with the vendor. |
| Phone Number | The main contact number for the vendor or the contact person. |
| VAT Number (if applicable) | Vendor’s Value Added Tax registration number, used for tax and billing purposes. |
| Address (Street, City, State, Zip Code, Country) | The complete address details of the vendor, including street, city, state, postal code, and country. |
4. Tick the checkbox “I agree to the Terms & Conditions”.
5. Click Register to submit the registration form.
System Behavior After Submission:
– A notification is sent to the Admin alerting them of a new vendor registration request.
– The vendor account remains in Pending Status until approved by the admin.
– The vendor receives an acknowledgement email confirming the registration submission.
Step 3: Admin Approval of Vendor Registration
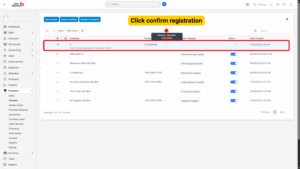
Once a vendor submits the registration form, the admin must approve it before the vendor can access the portal.
1. Go to the Admin Portal.
2. Navigate to the Purchase module from the left sidebar.
3. Select Vendor menu.
4. Locate the vendor with Pending status in the vendor list.
5. Click Confirm Registration to approve the account.
Alternatively:
1. You can open the Vendor Account Detail page and click Confirm from there.
2. Once confirmed:
– The vendor status will change to Active.
– A confirmation email will be automatically sent to the vendor informing them that their account has been activated.
Note
If the registration is incomplete or invalid, the admin can reject or delete the request. The vendor will be notified via email if the account is not approved.

Step 4: Vendor Account Activation and Access
After the admin confirms the registration:
1. The vendor receives a confirmation email containing:
– Account activation details
– Portal login link
2. The vendor can now log in using their registered email and password.
3. Vendors can access their dashboard, view quotations, purchase orders, and manage their own company profile.