Purchase Module – Option Settings Configuration Guide
Overview
The Purchase – Option Settings page allows system administrators to enable or disable various optional features that control how the purchase module behaves. These settings provide flexibility in managing quotations, purchase requests, tax display, document numbering, and vendor interactions through the vendor portal.
Configuring these options properly helps streamline the purchasing process, improve system automation, and align document formats with your company’s procurement policies.
Accessing Option Settings
Step 1: Navigate to the Settings menu under the Purchase module from the left sidebar.
Step 2: Select Purchase Option.
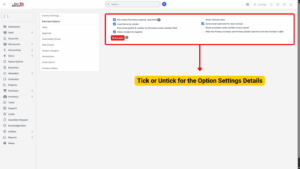
Step 3: Review each setting and enable or disable according to your organization’s workflow.
Step 4: Click Save to apply the configuration.
Option Settings Details
1. Not Creating Purchase Request / Quotation
– Function: When enabled, the Quotation field is hidden on the “Add Purchase Order” page.
– Usage Scenario:
Ideal for organizations that create Purchase Orders directly without going through the Request or Quotation stage.
– Impact: Streamlines PO creation by reducing unnecessary steps.
2. Load Items by Vendor
– Function: When enabled, the system loads only items associated with the selected vendor during the creation of a Purchase Order or Quotation.
– If disabled: All items in the database will be displayed regardless of vendor.
– Benefits:
Reduces error when selecting items
Speeds up PO creation process
Ensures item-vendor mapping is followed
3. Only Show Prefix & Number on Purchase Order Number Field
– Function:
Enabled: The PO number format = Prefix - Number - Vendor Code
Disabled: The PO number format = Prefix - Number - Month - Year - Vendor Code
– Benefits:
Enables cleaner and simpler PO numbering structure.
Useful when monthly or yearly tracking is not required in PO numbers.
4. Allow Vendor to Register
– Function: When activated, the vendor portal (/purchase/authentication_vendor) displays a “Register” button, allowing new vendors to self-register.
– Benefits:
Simplifies vendor onboarding.
Reduces administrative work in vendor management.
5. Show TAX per Item
– Function: Displays the Tax column in PDF documents, Purchase Order details, and Quotation details.
– Benefits:
Improves pricing transparency
Meets tax reporting requirements
Useful for vendors and finance teams
6. Send Email Welcome for New Contact
– Function: When enabled, the system automatically sends a welcome email to newly created contacts (e.g., vendors).
– Benefits:
Provides immediate confirmation to vendors.
Improves communication and vendor engagement.
Reduces manual email sending.
7. Reset Purchase Order Number Every Month
– Function: Automatically resets the Purchase Order number at the start of each month.
– Benefits:
Helps in monthly tracking of POs.
Keeps numbering organized and prevents long PO numbers over time.
8. Hide the Primary Contact and Primary Email Columns from the Vendors’ Table
– Function: Removes the Primary Contact and Primary Email columns from the Vendor List table view.
– Benefits:
Cleaner table interface
Useful if primary contact information is managed elsewhere
9. RESET DATA
Function: Deletes all data related to the Purchase module, including:
– Purchase Request
– Quotation
– Purchase Order
– Contract
– Purchase Invoice
– Debit Note
– Return Order
– Payments related to Purchase Invoice
Note
– Does not affect the Inventory module.
– Settings data and items remain intact.
– Related tasks in Quotation, PO, Contract, etc., are also deleted.
Use with Caution: This action is irreversible and should only be used when resetting the system or cleaning data for a new operational cycle.
