Purchase Module – Unit Settings Configuration Guide
Overview
The Unit Settings feature in the Purchase Module allows administrators to define and manage measurement units used throughout the procurement process. Units such as pieces (pcs), kilograms (kg), or meters (m) standardize how item quantities are displayed and processed, ensuring consistency and accuracy in Purchase Orders, Quotations, and Inventory records.
This guide outlines the steps to add, edit, and delete units in your organization.
Accessing Unit Settings
Step 1: Navigate to the Settings menu under the Purchase module from the left sidebar.
Step 2: Select Units to access the unit management page.
Here, you can view a list of all existing units, their codes, symbols, and display status.
Adding a New Unit
Adding a new unit allows you to expand your unit list and standardize measurement options for newly introduced products.
Steps to Add a New Unit:
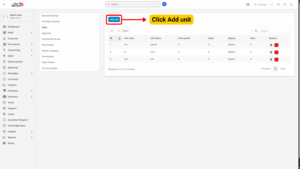
1. Go to the Settings menu under the Purchase module.
2. Select the Units menu.
3. Click the “Add Unit” button.
4. On the Add Unit page, fill in the required fields:
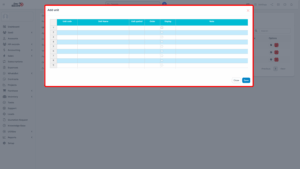
| Field | Description | Example |
|---|---|---|
| Unit Code | Unique code to identify the unit. | KG001 |
| Unit Name | Descriptive name of the unit. | Kilogram |
| Unit Symbol | Symbol or short form for the unit. | kg |
| Order | Determines the display order in the unit dropdown list. Units with smaller numbers appear first. | 1 |
| Display | Check to make the unit visible in dropdown lists in the Items menu. Uncheck to hide the unit. | ✅ Checked |
| Note | Optional field to add remarks or references about the unit. | “Used for weight-based items.” |
5. Click the “Save” button to complete the setup.
Tip
Use short and intuitive unit codes and symbols to make them easily identifiable during item creation or purchase order entry.

Editing an Existing Unit
You can update unit details if there are changes in naming conventions, display settings, or other details.
Steps to Edit a Unit:
1. Go to the Settings menu under the Purchase module.
2. Select the Units menu.
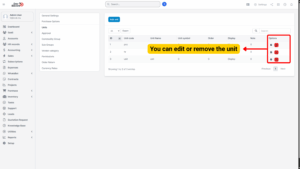
3. Hover over the unit you wish to modify and click the “Edit” icon.
4. Make the necessary changes in the Edit Unit page.
5. Click “Save” to apply the changes.
Deleting a Unit
If a unit is no longer in use or has been replaced, you can safely delete it to keep your unit list clean and relevant.
Steps to Delete a Unit:
1. Go to the Settings menu under the Purchase module.
2. Select the Units menu.
3. Hover over the unit to be deleted and click the “Delete” icon.
4. Confirm the action in the pop-up window.
5. The unit will be permanently deleted from the system.
Info
– Deleting a unit may affect items currently using that unit.
– It is recommended to reassign or update items linked to the unit before deletion.