Items Configuration & Management Guide
Module: Purchase
Purpose: To manage and add new items that can be used in purchasing, selling, and inventory tracking activities.
Overview
The Items feature in the Purchase module is designed to help businesses efficiently manage their product catalog. Through this feature, users can create new items, import multiple items using an Excel template, update existing information, delete unnecessary records, and adjust prices. Each item entry supports essential details like SKU codes, commodity groups, tax configuration, and images, ensuring a structured and consistent product database.
Create a New Item
Follow these steps to add a new item into the system:
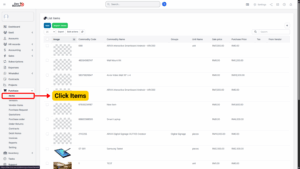
Step 1: Navigate to Items Menu
– Go to the Purchase module from the left sidebar.
– Select Items.
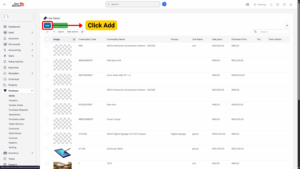
Step 2: Add New Item
– Click the Add button located at the top right.
Step 3: Fill Item Information
Complete the following fields in the Add Item form:
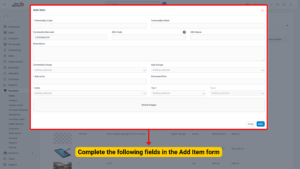
| Field | Description |
|---|---|
| Commodity Code | Unique identifier for the item. This must be manually entered and cannot be duplicated. |
| Commodity Name | Descriptive name of the item. |
| Commodity Barcode | Automatically generated. Only digits are allowed — no letters or symbols. |
| SKU Code | Internal tracking code for stock-keeping. |
| SKU Name | Descriptive label associated with the SKU. |
| Description | Detailed explanation of the item, including specifications, packaging details, or usage instructions. |
| Commodity Group | Select the relevant group from Commodity Group settings. |
| Sub Groups | Choose a specific subgroup for better classification. |
| Sale Price | Final selling price for the item. |
| Purchase Price | The price at which the item is procured. |
| Units | Unit of measure (e.g., piece, box, kg), selectable from Units settings. |
| Tax 1, Tax 2 | Select applicable tax rates (e.g., VAT, GST). These will apply during transactions. |
| Attach Images | Upload item images for quick identification in listings. |
Step 4: Save the Item
– Once all required fields are filled, click Save to complete the creation process.
Import Items (Bulk Upload)
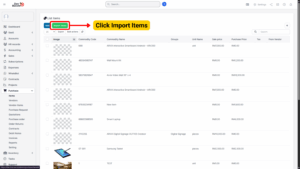
If you need to add multiple items at once, you can use the Import function.
Step 1: Go to the Purchase module > Items menu.
Step 2: Click Import Items.
Step 3:
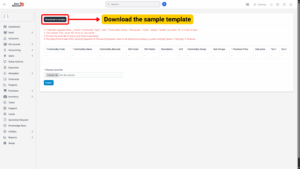
– Download the sample template by clicking Download Sample.
– This file contains the correct column structure for importing items.
Step 4: Fill in the required item data in the downloaded file and save it.
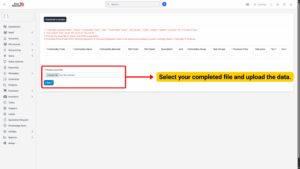
Step 5: Click Choose File under Choose Excel file and select your completed file.
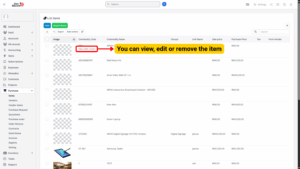
Edit Existing Items
Step 1: Navigate to Purchase module > Items.
Step 2: Hover over the item you want to update and click Edit.
Step 3: Modify the necessary fields.
Step 4: Click Save to apply changes.
Delete Items
You can remove single or multiple items from the system.
a) Single Deletion
– Hover over the specific item.
– Click Delete.
– Confirm the deletion in the pop-up.
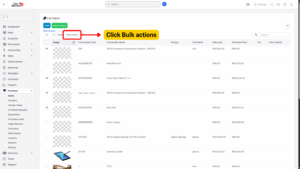
b) Bulk Deletion
– Select multiple items using the checkbox.
– Click Bulk Action.
– Select Mass Delete and confirm.
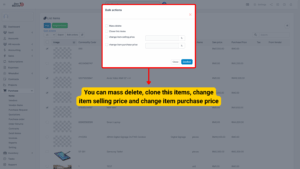
Clone Items
This feature is useful when you want to duplicate existing items with minimal changes.
1. Select the items to be cloned.
2. Click Bulk Action.
3. Choose Clone this Items.
4. Click Confirm.
Change Item Selling Price (Bulk)
1. Select the items to be updated.
2. Click Bulk Action.
3. Choose Change Item Selling Price.
4. Enter the new price and confirm.
Change Item Purchase Price (Bulk)
1. Select the items to be updated.
2. Click Bulk Action.
3. Choose Change Item Purchase Price.
4. Enter the new purchase price and confirm.