Vendor Management Guide
Module: Purchase
Feature: Vendor
Purpose: To register, manage, and maintain supplier information used in procurement transactions such as purchase orders, quotations, invoices, and debit notes.
Overview
Vendor management is a critical component of the procurement process. It enables organizations to maintain an accurate and comprehensive record of all vendors (suppliers) that provide products or services to the business.
By adding vendors to the system, you ensure:
– Accurate and consistent supplier data
– Easier creation of purchase transactions (orders, quotations, invoices, debit notes)
– Streamlined communication with suppliers
– Clear tracking of financial and return transactions
– Better accountability through vendor admins
In this system, vendors can be created manually or imported in bulk. Each vendor can have its own unique details, including company information, billing and shipping addresses, return policies, preferred currency, and language preferences.
Accessing the Vendor Menu
To access the Vendor feature:
1. Navigate to the left sidebar menu.
2. Click on Purchase Module.
3. Select Vendor.
This will open the Vendor Management interface, where you can:
– View a list of existing vendors
– Add a new vendor
– Import vendor data
– Edit or delete existing vendors
– Assign admins to manage vendor communications
– Access transaction history related to each vendor
Creating a New Vendor
To register a new vendor in the system, follow these steps:
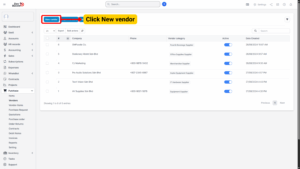
Step 1: Open the Vendor Creation Page
– Click on the New Vendor button located at the top right of the Vendor list page.
Step 2: Enter Basic Vendor Information
You will be directed to the Vendor Creation Form, which is organized into three main tabs:
Tab 1: Vendor Detail
This tab contains the essential company and contact information for the vendor. Each field has a specific role in transaction processing.

| Field | Description | Required |
|---|---|---|
| Vendor Code | A unique alphanumeric code that identifies the vendor in the system. It must not be duplicated. | Yes |
| Company | Official company name of the vendor. | Yes |
| Balance | The vendor’s current outstanding balance. This amount is automatically posted to accounting upon creation. | Optional |
| As of | The date when the balance is valid. When set, the system auto-generates a bill in the Accounting module (Bills), mapping it to “Other Selling Expenses” and “Accounts Payable (A/P)”. | Optional |
| VAT Number | Vendor’s tax ID or VAT registration number. | Optional |
| Phone | Vendor’s primary contact phone number. | Optional |
| Website | Official website of the vendor. | Optional |
| Address | Vendor’s head office or main address. | Optional |
| City, State, Zip Code, Country | Complete location information for accurate shipping and tax calculation. | Optional |
| Currency | Preferred currency for transactions. If left blank, system default is used. | Optional |
| Default Language | Preferred language for communication (e.g., English, Malay). This affects emails, documents, and vendor communications. | Optional |
Tip
Always use a clear naming convention for Vendor Codes (e.g., SUPP001, SUPP002) to make searching and filtering easier in future transactions.

Tab 2: Billing & Shipping Address
This tab captures the vendor’s billing and shipping details. These addresses are important for generating purchase documents, invoices, and delivery instructions.
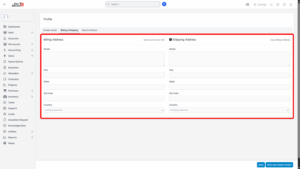
Billing Address
| Field | Description |
|---|---|
| Street | Street name and number for billing. |
| City | City where invoices should be sent. |
| State | State or province of the billing address. |
| Zip Code | Postal or ZIP code. |
| Country | Country of the billing address. |
| Same as Vendor Info | When checked, this copies all address details from the Vendor Detail tab. |
Shipping Address
| Field | Description |
|---|---|
| Street | Street name and number for the shipping address. |
| City | City where goods will be delivered. |
| State | State or province of the shipping address. |
| Zip Code | Postal or ZIP code for shipping. |
| Country | Country for the delivery destination. |
| Copy Billing Address | When clicked, the system copies the entire billing address into the shipping fields. |
Note
Accurate billing and shipping addresses ensure error-free invoicing, proper delivery, and legal compliance for tax purposes.

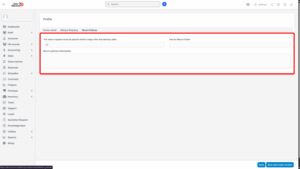
Tab 3: Return Policies
This tab allows you to set vendor-specific return rules that will be automatically referenced during return transactions.
| Field | Description |
|---|---|
| Return Request Period | Number of days after delivery during which return requests are allowed. |
| Return Order Fee | Any restocking or processing fee applied to returns. |
| Return Policy Information | Detailed description of the vendor’s return process, conditions, and contact information for return authorization. |
Example:
-
Return request must be submitted within 14 days of delivery.
-
All returned goods must be unused and in original packaging.
-
A 10% restocking fee applies for non-defective items.
Step 3: Save Vendor Information
Once all the required fields and relevant optional information are filled:
– Click Save to store the vendor record.
– Or click Save and Create Contact to immediately add contact persons related to this vendor (e.g., sales reps, account managers).
Importing Vendors (Bulk Upload)
If your organization has a large number of vendors, you can save time by importing them in bulk using an Excel file.

Steps:
1. Navigate to Purchase module > Vendor.
2. Click Import Items.
3. Download the sample import template by clicking Download a Sample.
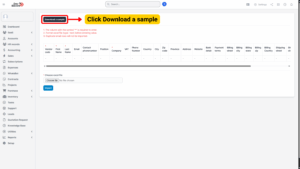
4. Fill in the required vendor details in the Excel file.
5. Save the file and click Choose File to upload it.
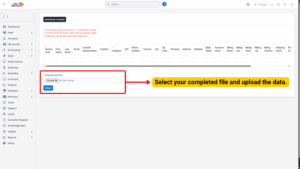
6. Click Import.
– If the import is successful, all vendors will be added to the system.
– If the import fails:
Click Error File Download.
Open the file and check the Error column for details.
Fix the highlighted issues and re-import.
Viewing Vendor Details
To view and manage vendor information:
1. Go to Purchase module > Vendor.
2. Select a vendor and click View.
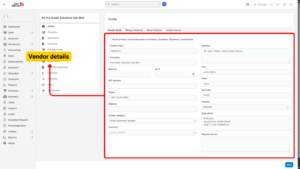
The Vendor Detail Page displays:
1. General company and contact details
2. Billing & shipping addresses
3. Return policies
4. Assigned admin(s)
5. Transaction history
Assigning Admins to Vendors
Assigning a Vendor Admin allows specific employees to be responsible for managing communication and transactions with a particular vendor.
Steps:
1. Open the Vendor Detail Page.
2. Go to the Vendor Admins tab.
3. Click Assign Admin.
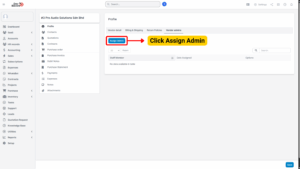
4. Select one or multiple employees from the staff list.
5. Click Save.
Once assigned:
The selected employees will receive notifications for all vendor-related activities such as:
– New quotation from the vendor
– Purchase order updates
– Payment and return updates
Tip
Assign admins based on department (e.g., Procurement, Finance) to ensure accountability and streamlined communication.
Editing a Vendor
If vendor information needs to be updated (e.g., new contact number or address change):
1. Go to Purchase module > Vendor.
2. Hover over the vendor you want to update.
3. Click Edit.
4. Make the necessary changes.
5. Click Save.
Changes made will be reflected in future transactions automatically.
Deleting a Vendor
Vendors that are no longer active can be removed from the system.
1. Go to Purchase module > Vendor.
2. Hover over the vendor you wish to delete.
3. Click Delete.
4. Confirm your action in the pop-up window.
Note
– Deleting a vendor is irreversible.
– If the vendor is linked to previous transactions, those records will remain in the system, but the vendor will no longer be selectable for new transactions.
– It’s recommended to deactivate rather than delete vendors with historical data, if your system supports it.