CSV Campaign – Whatsbot Module
Overview
The CSV Campaign feature in the Whatsbot module allows users to send customized WhatsApp message campaigns to a list of recipients defined in a CSV file. This feature is ideal for businesses or organizations that wish to target specific customers, leads, or event participants without relying solely on existing contact or lead databases within the system.
With CSV Campaigns, users can personalize and manage large-scale message sending efficiently, while maintaining full control over contact data and campaign details.
Accessing the CSV Campaign Feature
1. From the main Dashboard, navigate to the sidebar menu.
2. Click Whatsbot → CSV Campaign.
3. You will be directed to the CSV Campaign Management page, where you can create new CSV-based campaigns and view existing ones.
Creating a New CSV Campaign
To begin sending a new campaign using a CSV file, follow these steps:
1. Click “Send from CSV File” or “Add CSV Campaign” button.
2. A form will appear for you to input the necessary information.
Step 1: Fill in Campaign Information
Campaign Name
Enter a descriptive name for your campaign.
Example: Customer Appreciation 2025, New Product Launch CSV Campaign, or Promo Code Distribution.
Tip
Use meaningful names for easier campaign tracking and reporting.

Step 2: Upload the CSV File
Choose CSV File
Select the CSV file from your computer that contains the list of recipients and their contact details.
The system will process this file to send messages according to your campaign settings.
Note
Before uploading, you must ensure the CSV file follows the required format and rules.

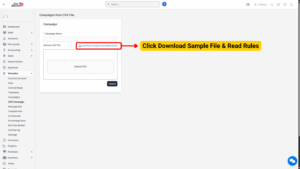
Step 3: Download Sample File and Read Rules
Before uploading your CSV file, click “Download Sample File & Read Rules.”
This step is crucial as it provides:
– A sample CSV file with the correct structure.
– The formatting rules you must follow to ensure a successful upload.
What You’ll Find in the Sample File
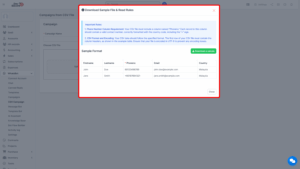
CSV File Rules
When preparing your CSV file, follow these important guidelines:
1. Ensure all phone numbers include the country code and contain no spaces or special characters.
2. The CSV file must be encoded in UTF-8 to prevent character errors.
3. Column headers must exactly match the required names.
4. Avoid leaving any blank rows or columns.
5. Each row represents one recipient.
6. If messages are customized per user, ensure text entries are accurate and concise.
Step 4: Save and Send the Campaign
Once you have uploaded your CSV file:
1. Review the file details displayed on-screen.
2. Verify that the total number of recipients is correct.
3. Click “Save” to store the campaign for later sending, or click “Send Now” to dispatch messages immediately.