Whatsbot Module – WhatsApp Auto Lead Settings
Overview
The WhatsApp Auto Lead feature in the Whatsbot module allows the system to automatically create new leads from incoming WhatsApp messages. This automation ensures that all potential customers or inquiries received through WhatsApp are captured and recorded as leads in the CRM without manual intervention.
Before configuring this feature, ensure that the Whatsbot integration is correctly set up and connected to your WhatsApp account.
Accessing Whatsbot Settings
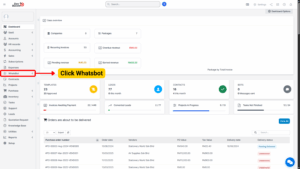
1. From the Dashboard, locate and click “Whatsbot” on the left sidebar menu.
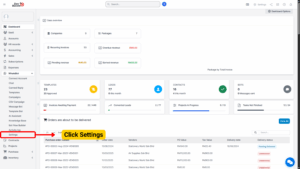
2. Select “Settings” to open the configuration page.
3. You will see seven (7) settings sections available.
4. Click on the section labeled “WhatsApp Auto Lead.”
WhatsApp Auto Lead Configuration
This section controls how new WhatsApp messages are automatically converted into leads within your system.
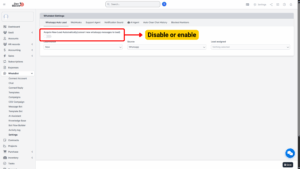
1. Enable or Disable Auto Lead Creation
| Option | Description |
|---|---|
| Acquire New Lead Automatically | When enabled, the system will automatically convert every new WhatsApp message from unknown contacts into a lead. |
– Usage:
Enable: Toggle the switch ON if you want Whatsbot to create leads automatically for every new contact that sends a message.
Disable: Toggle the switch OFF if you prefer to manually create leads.
2. Lead Status Configuration

– Field Name: Lead Status
– Purpose: Defines the initial status of the lead when it is automatically created.
Available Options:
| Lead Status | Description |
|---|---|
| New | Default status for fresh, uncontacted leads. |
| Partner | Use for business partners or collaboration contacts. |
| Event Attendees | Suitable for leads coming from event registrations or promotions. |
| Customer | Use for existing or returning customers. |
3. Lead Source Configuration
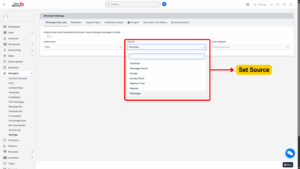
– Field Name: Source
– Purpose: Identifies where the lead originated from.
Available Sources:
| Lead Source | Description |
|---|---|
| Default source for messages received directly through Whatsbot. | |
| For leads synced from Facebook integrations. | |
| Flexstage Events | For contacts captured through event management platforms. |
| For leads imported or synced via Google forms or campaigns. | |
| Gravity Forms | For form-based leads submitted through Gravity Forms integration. |
| Webhook Test | For testing data received from webhook connections. |
| Website | For leads generated via the company’s website inquiry forms. |
| WhatsApp (duplicate entry) | Can be used if you have multiple WhatsApp channels and wish to differentiate sources. |
4. Lead Assignment
– Field Name: Lead Assigned
– Purpose: Determines which staff member will be responsible for handling new auto-generated leads.
Configuration:
– Click the dropdown list to view all available staff members in your organization.
– Select the appropriate staff member who should manage new WhatsApp leads.
Tip
Assign leads to a sales representative, customer support agent, or marketing staff to ensure prompt response and proper tracking.

Saving and Applying Changes
After completing the configuration:
1. Review all selected options carefully.
2. Click the “Save Changes” or “Update Settings” button at the bottom of the page.
3. The system will apply your settings immediately.
Once saved, all incoming WhatsApp messages from new contacts will automatically be converted into leads with the defined status, source, and assigned staff member.