Vendor Contact Management Guide
Overview
The Vendor Contact feature allows administrators or authorized users to create and manage individual contact persons associated with a vendor account. These contacts represent the people who will communicate with your company, receive notifications, access the vendor portal, and manage vendor-related activities.
Each vendor can have multiple contacts, but only one primary contact. The primary contact acts as the main representative of the vendor, with elevated access rights to the company profile and settings.
Step 1: Access the Vendor Contact Menu
To begin adding a contact, first navigate to the Vendor section:
1. Log in to the Admin Portal.
2. From the left sidebar, go to the Purchase module.
3. Select Vendor from the menu.
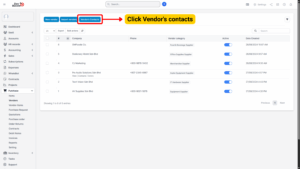
4. Choose one of the following options to access the contact creation page:
a) Option 1:
Hover over the vendor record → click Contacts.
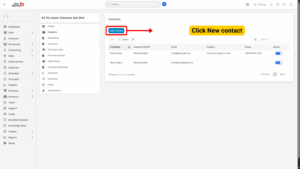
b) Option 2:
Click the Vendor Name to open its Vendor Detail page → go to the Contacts tab → click New Contact.
Step 2: Fill in Contact Information
In the New Contact form, provide the required details:
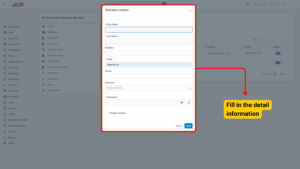
| Field Label | Description |
|---|---|
| First Name | Enter the contact person’s given name. |
| Last Name | Enter the contact person’s surname or family name. |
| Provide a valid email address for the contact. This will serve as the unique login credential for accessing the vendor portal. ⚠️ The system will not allow duplicate emails across different contacts. | |
| Password | Set a secure password for the contact’s account. The contact can change this password after the first login. |
| Primary Contact (Checkbox) | If checked ✅: The contact will be designated as the Primary Contact for the vendor and will have full access to view and edit the Vendor Company Profile through the Vendor Portal. Only one primary contact is allowed per vendor.
If unchecked ❌: The contact will be a secondary contact with limited access (cannot view or edit the company profile). |
Step 3: Save the Contact
Once all required fields are filled in:
1. Review the entered details to ensure accuracy.
2. Click the Save button.
The system will:
– Create the contact and associate it with the selected vendor.
– Send an email notification (if email notifications are enabled) to the contact with their account credentials.
– Update the Vendor Contact List.
Note: The contact must use the registered email and password to log in to the Vendor Portal.
Step 4: Manage Existing Contacts
Once a contact has been created, administrators can manage them directly from the Vendor Detail → Contacts tab.
Available actions:
1. Edit – Update name, email, or reset password.
2. Delete – Remove the contact from the system (cannot delete the only primary contact without assigning a new one).
3. Set as Primary – If you wish to change the primary contact, select another existing contact and check Primary Contact, then save.
Note
When changing the primary contact, the previous one will automatically lose their “Primary” privileges.
