Vendor Category Settings Configuration Guide
Module: Purchase → Settings
Purpose: Manage vendor classification for efficient organization and reporting.
Overview
The Vendor Category Settings feature allows you to define and manage categories for vendors in your organization. Vendor categories help streamline vendor classification, improve reporting accuracy, and make vendor management more organized.
These categories are displayed in the New Vendor Creation page under the Vendor menu, allowing users to easily assign vendors to relevant groups.
Add a New Vendor Category
To add a new vendor category to your organization:
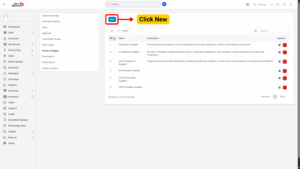
Step 1: Access the Settings Menu
– From the left sidebar, go to Purchase module → Settings.
Step 2: Open Vendor Category
– Select Vendor Category from the menu.
– Click on the “New” button at the top right of the page.
Step 3: Fill in Vendor Category Details
On the New Vendor Category page, complete the following fields:
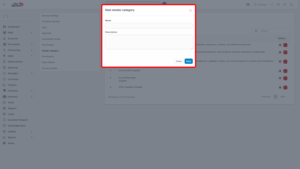
| Field | Description |
|---|---|
| Name | Enter the name of the vendor category. |
| Description | Provide a brief description of the vendor category. |
Step 4: Save the New Vendor Category
– Click “Save” to finalize the new vendor category.
– The new category will now be available in the Vendor Creation page for assignment.

Edit Vendor Category
If a vendor category needs to be updated or corrected, follow these steps:
Step 1: Access the Settings Menu
– Navigate to Purchase module → Settings from the left sidebar.
Step 2: Open Vendor Category Settings
– Select Vendor Category.
– Locate the category you want to modify and click “Edit.”
Step 3: Make Necessary Changes
– Update the Name or Description fields as needed.
– Ensure the changes accurately reflect the new classification.
Step 4: Save Changes
– Click “Save” to apply your updates.
– The system will automatically reflect the new details in all related vendor records.
Delete Vendor Category
If a vendor category is no longer required, it can be deleted.
Step 1: Access the Settings Menu
– From the left sidebar, navigate to Purchase module → Settings.
Step 2: Open Vendor Category
– Select Vendor Category from the menu.
– Locate the vendor category to be removed.
Step 3: Delete the Category
– Click “Delete” beside the chosen category.
Step 4: Confirm Deletion
– A pop-up confirmation will appear.
– Click “Confirm” to permanently delete the vendor category.
Note
Ensure no active vendors are assigned to this category before deleting to avoid data conflicts.
