Sub Group Setting Configuration Guide
Module: Purchase → Settings
Purpose: Manage sub groups for organizing and categorizing commodities effectively.
Overview
The Sub Group Setting feature allows your organization to create and manage sub groups that help structure your inventory more efficiently. These sub groups will appear in the Sub Group combo box on the Add/Edit Item page, enabling users to select the appropriate classification for each item.
Sub groups are linked to Commodity Groups. Only commodity groups marked as Display will be available when assigning sub groups.
Add New Sub Group
Follow the steps below to create a new sub group:
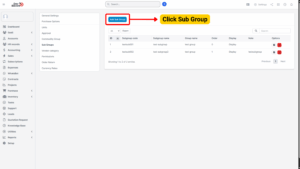
Step 1: Access the Settings Menu
– From the left sidebar, go to Purchase module → Settings.
– Select Sub Groups.
Step 2: Open the Add Sub Group Form
– Click the “Add Sub Group” button.
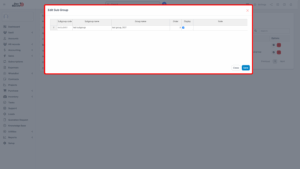
Step 3: Enter Sub Group Details
In the Add Sub Group page, provide the following information:

a) Sub Group Code:
– Enter a unique code to identify the sub group.
b) Sub Group Name:
– Enter the descriptive name of the sub group.
c) Group Name:
– Double-click to open the list of available commodity groups.
– Select the appropriate Group Name from the list.
Note
Only commodity groups marked as Display in Commodity Group Settings will appear here.

d) Order:
– Assign a display order number.
– Sub groups with smaller numbers appear at the top of the dropdown list in the Add/Edit Item form.
e) Display:
– Check this box to make the sub group visible in dropdown lists.
– Uncheck to hide the sub group (useful for sub groups that are no longer active but shouldn’t be deleted).
Step 4: Save the Sub Group
– Click “Save” to complete the process.
– The newly added sub group will now appear in the Sub Group combo box on the Add/Edit Item page.
Edit Existing Sub Group
To update or modify an existing sub group:
Step 1: Access Sub Groups Menu
– Go to Purchase module → Settings → Sub Groups.
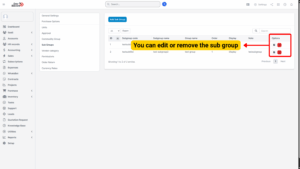
Step 2: Select the Sub Group to Edit
– Hover over the sub group entry you want to update.
– Click “Edit”.
Step 3: Update Information
– Modify any of the fields: Sub Group Code, Name, Group Name, Order, Display status, or Notes.
Step 4: Save Changes
– Click “Save” to apply the updates.
– Changes will reflect immediately in the relevant dropdown lists.
Delete Sub Group
To remove a sub group that is no longer required:
Step 1: Access Sub Groups Menu
– Go to Purchase module → Settings → Sub Groups.
Step 2: Select Sub Group to Delete
– Hover over the sub group entry.
– Click “Delete”.
Step 3: Confirm Deletion
– A confirmation pop-up will appear.
– Click “Confirm” to permanently delete the sub group.
Note
Once deleted, the sub group will no longer be available in the Add/Edit Item form. If the sub group is still linked to any items, consider reassigning or archiving it instead of deleting.