Tasks
The Tasks feature is designed to help businesses and teams manage work assignments efficiently. It allows users to create, organize, and track tasks related to projects, accounts, invoices, or other business activities. By centralizing task management in one system, teams can improve productivity, accountability, and collaboration.
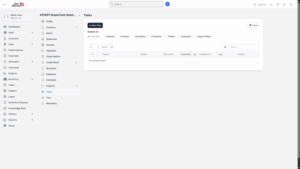
Viewing Tasks
When you access the Tasks section, you will see a complete task list.
– Tasks are displayed with key details such as subject, due date, priority, and status.
– You can filter or choose what tasks you want to see by ticking the relevant options (e.g., by project, assignee, priority level, or related item).
– This allows you to focus only on tasks that are relevant to your role or responsibility.
Adding a New Task
To create a new task, follow these steps:
1. Go to the Tasks section in the dashboard.
2. Click on the + New Task button.
3. Fill in the task form with the required details:
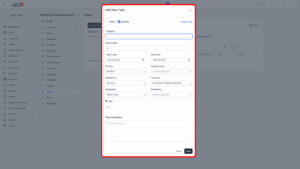
a) Subject – The main title of the task (e.g., “Prepare Project Proposal”).
b) Hourly Rate – If the task is billable, specify the rate per hour.
c) Start Date – The planned start date for the task.
d) Due Date – The deadline or completion date.
e) Priority – Choose the urgency of the task: Low, Medium, High, or Urgent.
f) Repeat Every – Set a recurring frequency (e.g., Weekly, Monthly, Every 3 Months, Annually, or Custom).
g) Related To – Link the task to a project, invoice, account, quotation, contract, ticket, expense, lead, or opportunity.
h) Account – Select the account that the task is associated with.
i) Assignees – Choose the team member(s) responsible for completing the task.
j) Followers – Add individuals who need to be notified or kept updated on the progress.
i) Tags – Add keywords for easy search and grouping.
k) Task Description – Provide detailed instructions, objectives, or notes for the task.
l) Public (optional) – Tick if the task should be visible to clients or external users.
m) Billable (optional) – Tick if the task will generate billable hours that can be invoiced later.
4. Once all information is completed, click Save.
5. The new task will appear in the task list, ready to be tracked and managed.