How to Add a New Project
The Projects feature in the Accounts Module allows businesses to organize, monitor, and manage client-related initiatives in a structured manner. By creating a project under a customer account, you ensure that all project activities, billing details, communications, and deliverables are centralized in one place. This makes it easier to track progress, assign responsibilities, and maintain transparency with both internal teams and clients.
Open the Project Section
To begin, go to the Accounts Module from the sidebar. Select the customer account you are working with, then navigate to the Projects section within that account. This will display all existing projects linked to that client.
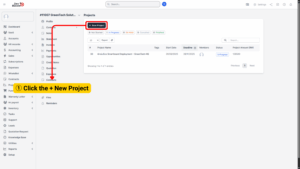
1. To start a new one, click the + New Project button
Provide Project Information
1. A project creation form will appear. Complete all necessary fields to define the project clearly:
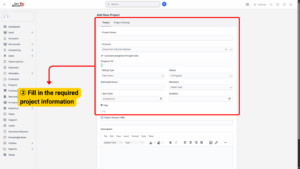
a) Project Name: Enter a descriptive name that reflects the nature of the work.
b) Account: Choose the correct customer account to which this project belongs.
c) Progress: If the project has already started, you may indicate the current percentage of completion.
d) Billing Type: Select how the project will be billed. Options include:
– Task Hours – Charges are calculated based on hours logged on each task.
– Fixed Rate – A flat fee for the entire project regardless of hours.
– Task Hours (Per Task) – Billing based on time tracked individually per task.
e) Status: Define the project’s current status. Choices include Not Started, In Progress, On Hold, Cancelled, or Finished.
f) Estimated Hours: Enter the number of hours you expect the project will take.
g) Members: Assign the team members or staff who will be responsible for carrying out the project.
h) Start Date & Deadline: Establish the project timeline by selecting the starting date and the expected completion date.
i) Tags: Add relevant tags to categorize the project for easier filtering and reporting.
k) Project Amount (RM): Specify the financial value of the project in Malaysian Ringgit (RM).
l) Description: Write a detailed explanation of the project scope, objectives, and any important notes.
2. Configure Project Settings
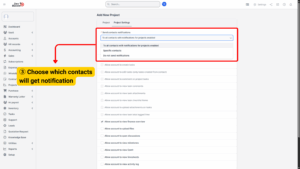
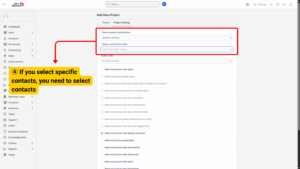

a) Send Contact Notifications: Choose whether all client contacts should be notified about updates or only specific individuals. If you select “Specific contacts,” you will need to indicate which people should receive notifications.
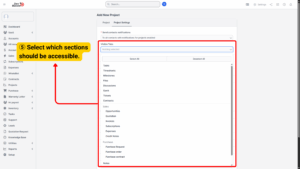
b) Visible Tabs: Decide which modules will be available inside this project (e.g., Tasks, Timesheets, Files, Discussions, Tickets).
c) Allowed Features: Tick the features you want the client’s account to have access to. This helps control what the client or team can see and use in the project.
After reviewing all details and settings, click Save. The system will create the project and automatically list it under the Project Module for that account. From here, you can start adding tasks, setting milestones, uploading files, and monitoring progress through the available features.