How to Process a Refund from a Credit Note
A refund is issued when a customer is entitled to receive money back instead of simply applying a credit to their outstanding invoices. This usually happens when a client cancels an order, returns goods, or requests repayment rather than keeping the balance for future use. The system makes this process straightforward by providing a dedicated Refund option under each credit note.
Access the Credit Note
1. From the sidebar navigation panel, go to Accounts and select Credit Notes.
2. A list of all issued credit notes will be displayed in the dashboard.
3. Locate the credit note associated with the customer or transaction you want to refund.
4. Click on the credit note to open its details.
5. In the top-right corner of the page, open the More dropdown menu.
6. From the dropdown options, select Refund.

Provide Refund Information
After clicking Refund, a refund entry form will appear. This form allows you to capture the full details of the transaction so it can be tracked and recorded in both customer records and financial reports.
1. Fill in the following fields:
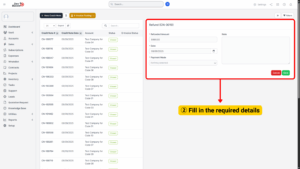
a) Refunded Amount – Enter the sum of money that is being reimbursed to the customer. .
b) Refund Date – Select the exact date the refund is processed. This should correspond to the payment transfer date, cheque issue date, or the actual day the cash was handed over.
c) Payment Mode – Choose the method used to return funds to the customer.
d) Additional Notes (optional) – Some systems allow you to add notes.
2. Once all fields have been completed, review the refund information carefully.
3. Double-check the amount, date, and payment mode to avoid errors.
4. Click Save to finalize the transaction.