Creating a Purchase Contract
A Purchase Contract is a formalized agreement between a business and a supplier that governs the supply of goods or services over a defined period of time. Unlike a Purchase Request or a Purchase Order, which are often created for one-off or short-term needs, a Purchase Contract is designed to handle long-term, recurring, or large-value procurement arrangements.
By establishing a contract, organizations set clear expectations regarding cost, payment schedules, timelines, and responsibilities. This reduces risk, enhances accountability, and creates a structured framework for procurement management.
Open the Purchase Contract Module
1. From the main dashboard, navigate to the sidebar menu and click on Purchase.
2. From the dropdown list, select Purchase Contract.
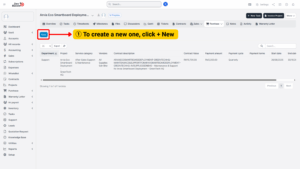
3. The system will redirect you to the Purchase Contract dashboard, where all existing contracts are displayed for monitoring and management.
4. To initiate a new contract, click on the + New button at the top right of the screen.
Provide General Contract Information
When the new contract form appears, fill in the following key details:

a) Contract Description – Give the contract a meaningful title that identifies its purpose.
b) Service Category – Classify the type of goods or services covered by the contract. This helps with reporting and future audits.
c) Vendor – Select the vendor or supplier from your database. If the vendor does not exist yet, you should register them before continuing.
d) Linked Purchase Order – If the contract is a continuation of or related to a specific Purchase Order, you can link the PO here. This ensures traceability.
e) Department – Specify which department is responsible for this contract. Associating contracts with departments is critical for budgeting and cost allocation.
f) Start Date – The official date when the contract becomes valid.
g) End Date – The termination or renewal date of the contract. Clearly defining this avoids open-ended obligations.
h) Payment Terms – Outline how payments will be made.
i) Payment Amount – Enter the agreed amount to be paid per payment cycle.
j) Payment Cycle – Define how often payments are due, such as Monthly, Quarterly, Semi-Annually, or Annually.
k) Contract Value – Record the total value of the contract over its full duration. This provides clarity for both budgeting and vendor relationship management.
l) Signed Status – Indicate whether the contract is still pending, already signed, or awaiting approval.
m) Signed Date – The date on which the contract was formally executed by both parties.
n) Attachments – Upload any scanned copies of the signed contract, supplementary agreements, or related vendor documents.
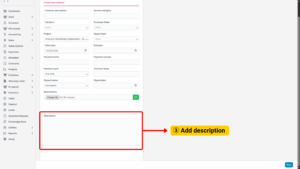
o) Additional Description – Enter notes or extra conditions that are specific to the agreement, such as renewal clauses, penalties for late delivery, or service-level guarantees.