Creating a Purchase Order (PO)
A Purchase Order (PO) is one of the most important documents in the procurement cycle. It acts as a legally binding agreement between your company and a vendor, confirming what items or services will be purchased, at what price, and under which terms. Creating a clear and accurate PO not only speeds up the procurement process but also reduces risks such as delays, incorrect deliveries, or disputes with suppliers.
Navigate to the Purchase Order Section
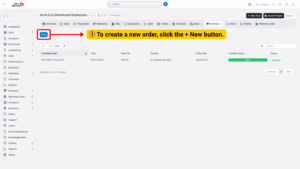
1. From your dashboard, open the Purchase module by clicking on Purchase in the sidebar menu.
2. A dropdown menu will appear with several procurement options. Select Purchase Order.
3. This will open the Purchase Order dashboard, where you can view, filter, and manage all existing POs.
4. To start a new order, click the + New button at the top of the screen.
Tip
Before creating a PO, it is good practice to check whether a
Purchase Request (PR) already exists for the items you need.
If it does, linking the PO to that PR will automatically pull the required items
into your order, reducing data entry time and minimizing errors.
Fill in the General Purchase Order Information
The purchase order form requires detailed information to ensure accuracy and proper tracking. Each field serves a specific function:
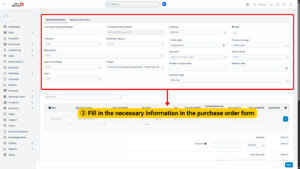
a) Purchase Order Description – Provide a descriptive title for the PO (e.g., “Procurement of Office Chairs for HR Department” or “IT Equipment for Project Alpha”).
b) Vendor – Choose the supplier from whom the goods or services will be procured. If the vendor is not already in the system, add their company profile.
c) Department – Select the department that initiated the purchase (e.g., IT, HR, Finance, Marketing). This ensures costs are allocated correctly.
d) Approval Settings – Determine the approval workflow. Depending on your company policy, this may involve line managers, finance officers, or directors.
e) Type – Indicate whether this order is a CAPEX (Capital Expenditure) or OPEX (Operating Expenditure).
f) Purchase Request – Link the order to a related Purchase Request if one exists. The system will automatically populate item details from the PR.
g) Currency – Select the currency in which the transaction will be made (MYR, USD, EUR, JPY, etc.).
h) Order Date – Enter the official date the PO is created.
i) Person in Charge – Assign responsibility for overseeing the order, including communication with the vendor.
j) Accounts – Link the PO to a specific account, cost center, or ledger in your financial system.
k) Sales Invoice – Attach a related sales invoice if this purchase is tied to fulfilling a client’s order.
l) Number of Days Owed – Define payment terms, such as Net 30 or Net 60, which specify the number of days allowed for payment after delivery.
m) Delivery Date – Indicate the expected delivery deadline. This ensures timely tracking of supplier commitments.
n) Discount Type – Choose how discounts should be applied: Before Tax, After Tax, or No Tax.
Add Item Details
Now move on to the Items Section, where you will list everything being ordered:
1. Click Add Item.
2. Enter the following details for each product or service:
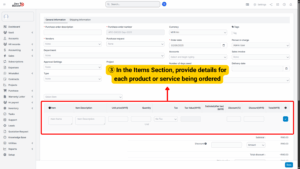
a) Item Name – The product’s name (e.g., “Dell Latitude Laptop”).
b) Item Description – A longer explanation or specifications (e.g., “14-inch, Intel i7, 16GB RAM, 512GB SSD, Windows 11 Pro”).
c) Unit Price – The cost per unit as quoted by the vendor.
d) Quantity – The number of units required.
e) Tax – Apply applicable tax codes (e.g., VAT, SST).
Provide Shipping and Delivery Information
1. In the Shipping Information section, enter complete delivery details to ensure smooth logistics:
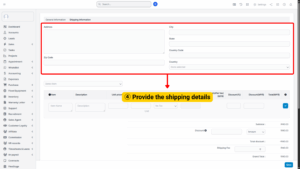
a) Address – Full shipping address where items should be delivered.
b) Zip Code – Postal code for the delivery location.
c) City – The city of delivery.
d) State/Region – The state or region within the country.
e) Country Code – The two-letter ISO code for the destination country (e.g., MY = Malaysia, US = United States).
f) Country – The full country name.
2. If discounts apply (e.g., bulk order discounts), enter them.
3. The system will calculate automatically:
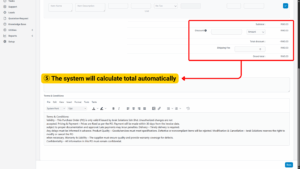
a) Subtotal – Item cost before discounts or shipping.
b) Total Discount – Any deductions applied.
c) Shipping Fee – Add charges for delivery or freight if applicable.
d) Grand Total – The final payable amount including discounts, tax, and shipping.
4. Carefully review all the entered details — vendor, item list, pricing, delivery address, and payment terms.
5. Double-check the approval settings to make sure the PO will follow the proper workflow.
6. Confirm that the Grand Total matches the quotation or budget allocation.
7. Once satisfied, click Save.
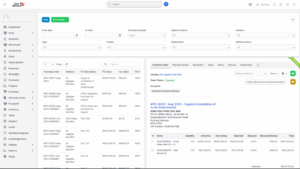
The newly created purchase order will now appear in the Purchase Order dashboard, ready for approval, vendor confirmation, and later tracking through to delivery.