How to Create a Purchase Request
A Purchase Request (PR) is an internal document raised when a client requests to purchase a product or service, but the item is not currently available in your inventory. Instead of immediately creating a sales order, a purchase request is submitted to the procurement team so the required items can be sourced from vendors or suppliers.
In other words, a purchase request bridges the gap between client demand and supplier procurement.
Access the Purchase Request Module
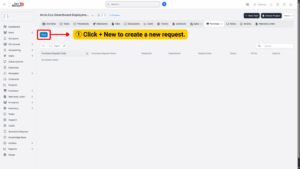
1. From the main dashboard, locate the sidebar menu and click on Purchase.
2. A dropdown menu will appear. Select Purchase Request from the list of available options.
3. This will take you to the Purchase Request dashboard, where you can view all previously created requests.
4. To create a new one, click the + New button at the top of the page.
Tips
Always check the dashboard first to ensure that a similar request hasn’t already been submitted by another team member. This avoids duplication.
Enter General Purchase Request Information
You will now be directed to a purchase request form, where you will need to provide the main details of the request.
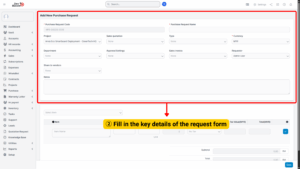
a) Purchase Request Code – A unique identifier for the request. This may be auto-generated by the system or created manually for tracking purposes.
b) Project – Select the project this request supports. Linking the PR to a project helps align expenses with project budgets.
c) Sales Quotation – Attach or reference a sales quotation if the request is part of a customer-related order.
d) Department – Identify which department is submitting the request.
e) Approval Settings – Define the approval chain. Depending on your company policies, this may require authorization from a manager, finance officer, or director.
f) Share to Vendors – If the request should be visible to specific vendors, select them here. This is useful if you want to compare quotations later.
g) Purchase Request Name – Provide a descriptive title for the request.
h) Type – Specify whether this request falls under CAPEX (Capital Expenditure) or OPEX (Operational Expenditure). This classification is important for accounting and budgeting.
i) Currency – Choose the transaction currency. Options include MYR, HKD, USD, EUR, JPY, depending on vendor location and pricing.
j) Sales Invoice – Link a related sales invoice if the purchase is directly tied to a customer order.
i) Requester – Enter the name of the person making the request. This identifies the point of contact for follow-up.
k) Note – Add any extra instructions, clarifications, or justifications for the request.
Note1. CAPEX (Capital Expenditure)
- Refers to funds a company spends on acquiring, upgrading, or maintaining long-term assets.
- Typically big, one-time investments that add value over multiple years.
- Examples:
- Purchasing machinery or equipment
- Building new offices or factories
- Upgrading IT infrastructure (servers, data centers)
- Vehicles for company use
- Usually recorded as an asset on the balance sheet and depreciated over time.
2. OPEX (Operating Expenditure)
- Refers to the day-to-day expenses a company incurs to run operations.
- These costs are recurring and fully deducted in the same accounting year.
- Examples:
- Rent and utilities
- Employee salaries and wages
- Office supplies
- Software subscriptions and licenses
- Maintenance and repairs
- Recorded as an expense in the income statement.
Add Item Details
After filling in the general information, move on to listing the items or services required.
1. In the Items section, click Add Item.
2. Provide details for each item:
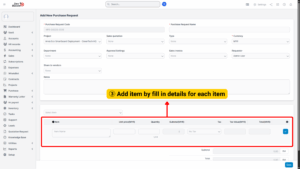
a) Item Name – The name of the product or service (e.g., “Dell Latitude Laptop” or “Annual Software License”).
b) Unit Price – The cost per unit, as quoted by the vendor or estimated.
c) Quantity – The number of units required.
d) Tax – Apply the relevant tax code (e.g., SST, VAT).
3. If the vendor offers a discount, enter it in the discount field. The system will automatically deduct the amount from the subtotal.
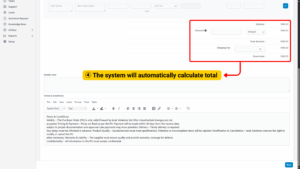
The system will also automatically calculate:
a) Subtotal – Total cost before discounts and shipping.
b) Total Discount – Deduction applied across items.
c) Shipping Fee – Add logistics or delivery charges if applicable.
d) Grand Total – The final payable amount including taxes, discounts, and shipping.
4. Before saving, carefully review all details — especially approval settings, department, and item pricing.
5. Confirm that the totals reflect your request accurately.
6. Once everything is verified, click Save.
7. The new Purchase Request will now appear in the Purchase Request dashboard, where it can be tracked through its approval workflow.