Bot Flow Builder – Whatsbot Module
Overview
The Bot Flow Builder in the Whatsbot module is an advanced tool that allows you to visually design and customize automated conversation flows for WhatsApp interactions. It enables businesses to create structured, intelligent chat sequences using a drag-and-drop interface — making it easy to plan customer journeys, automate responses, and guide users efficiently through information or services.
Whether it’s for customer onboarding, FAQs, product promotion, or AI-driven interactions, the Bot Flow Builder helps you streamline communication while maintaining a natural conversational experience.
Purpose
The Bot Flow Builder is designed to:
– Automate repetitive WhatsApp messages through structured, rule-based flows.
– Create customized customer journeys with message sequences and triggers.
– Blend static messages (text, images, documents) with AI-powered interactions.
– Reduce response time and improve customer satisfaction through intelligent automation.
– Provide flexibility to design personalized workflows that match your business goals.
Accessing the Bot Flow Builder
1. From the main system dashboard, open the sidebar menu.
2. Click Whatsbot → Bot Flow Builder.
3. You will be redirected to the Bot Flow Builder Management Page where you can view, edit, or create new bot flows.
Creating a New Bot Flow
To create a new flow for automated conversation handling:
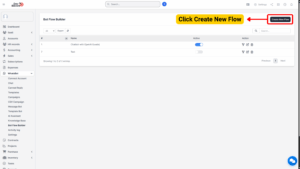
1. Click the “Create New Flow” button.
2. Enter the Flow Name — give it a meaningful title that reflects its purpose (e.g., “Product Inquiry Flow,” “Support Assistant,” or “Welcome Bot”).
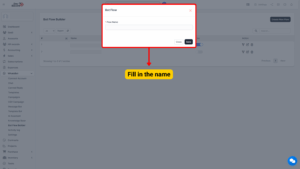
3. Click Save to create the flow.
4. After saving, your flow will appear in the list, and you can begin building the conversation logic.
Designing the Flow
Once your new flow is created, click the Flow Icon beside it to open the Flow Editor Interface.
This is the central workspace where you’ll build and connect all message components.
Upon opening, the system will automatically include a Start Bot Flow node. This serves as the entry point of your automation — where every conversation begins based on user-triggered messages.
Configuring the Start Bot Flow
You must configure the Start Bot Flow node before adding components.
This step determines how and when your flow will be triggered.
Fields Description
| Field | Description |
|---|---|
| Matching Type | Determines how the system matches the user’s message with the trigger phrase. Options: • Exact Match – The bot triggers only when the message exactly matches the keyword. • Contains – The bot triggers when the user’s message contains the keyword. |
| Relation Type | Defines the user category that can trigger this flow. Options: Leads or Contacts. |
| Trigger Message | The keyword or phrase that activates the flow. Example: “Hi”, “Support”, or “Order Status.” |
After completing these fields, click Save to confirm your trigger configuration.
Tip
Use simple, easy-to-remember trigger messages to ensure users can activate the flow without confusion.

Adding Components to the Flow
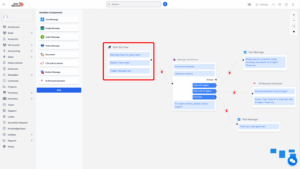
Once your Start Bot Flow is configured, you can begin adding components from the left-side component menu.
Each component represents a specific type of message or action in the conversation flow.
You can drag and drop these components into the workspace and connect them with directional arrows to define the conversation path.
Available Components
| Component | Description |
|---|---|
| 1. Text Message | Sends a plain text response to the user. Ideal for greetings, instructions, or general information. |
| 2. Image Message | Sends an image as part of the bot’s response. Useful for product photos, banners, or infographics. |
| 3. Audio Message | Allows the bot to send an audio clip to users. Great for personalized greetings, instructions, or voice-based campaigns. |
| 4. Video Message | Sends a video message. Commonly used for product demonstrations, tutorials, or marketing messages. |
| 5. Document | Sends downloadable documents such as brochures, guides, or policy PDFs. |
| 6. CTA (Call to Action) | Creates interactive buttons that encourage users to perform specific actions (e.g., visiting a website or calling support). |
| 7. Button Message | Displays multiple buttons for quick user choices. Perfect for guided flows or multiple options. |
| 8. AI Personal Assistant | Integrates your AI assistant into the flow. The AI can handle open-ended user queries beyond predefined responses. |
Building the Conversation Flow
1. Drag and Drop Components:
From the left-side menu, drag desired components into the workspace.
2. Connect Components:
Use directional lines (arrows) to connect the components and define the sequence. The conversation will follow this flow in order.
3. Customize Each Component:
Click on each component to open its settings panel. Here you can input text, attach media, configure buttons, or link to the next step.
4. Test the Flow:
Once your components are connected, simulate user interaction to ensure the flow works correctly.
5. Save the Flow:
After finalizing your configuration, click Save Flow to store all progress.
Tip
Combine static messages (text, image, button) with the AI Personal Assistant component for a balance between automation and intelligence.
Example Bot Flow Setup
Scenario: Customer Inquiry Automation
Goal: Automatically greet users, provide quick links, and offer AI assistance.
Flow Sequence Example
1. Start Bot Flow:
– Matching Type: Contains
– Relation Type: Leads
– Trigger Message: “Hello”
2. Text Message:
“Hi there! 👋 Welcome to our company. How can I assist you today?”
3. Button Message:
– “View Products”
– “Check Pricing”
– “Talk to Support”
4. CTA Component (Optional):
– Action: Visit Website
– URL: https://www.companywebsite.com/products
5. AI Personal Assistant:
If user types custom queries, the AI assistant will handle them using knowledge base data.
Note
The bot greets users, offers quick options, and provides smart responses through AI when needed.
