Project Module – Purchase Order Management
The Purchase Order (PO) feature in BizCore allows you to formally request goods or services from vendors after confirming product availability. It ensures that your procurement process is documented, approved, and clearly communicated to suppliers.
This article explains how to create, configure, and manage purchase orders, including both General Information and Shipping Information sections.
Accessing the Purchase Order Section
1. From the Main Dashboard, navigate to Projects.
2. Open the project where you want to create the purchase order.
3. In the project view, go to Purchase in the sidebar menu.
4. Click Purchase Order to view all purchase orders associated with the project.
Creating a New Purchase Order
Follow these steps to create a new purchase order:
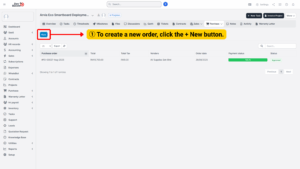
1. In the Purchase Order section, click + New.
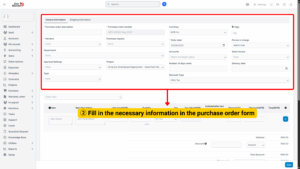
2. You will see two sections to fill in: General Information and Shipping Information.
1. General Information
Fill in the purchase order’s main details:
| Field | Description |
|---|---|
| Purchase Order Description | Enter a brief but clear description of the order (e.g., PO for Electrical Components). |
| Purchase Order Number | Assign a unique reference number for tracking. |
| Vendors | Select the vendor from whom you are purchasing. |
| Purchase Request | Link the purchase order to an existing purchase request for traceability. |
| Department | Specify the department responsible for the order. |
| Approval Settings | Configure approval workflow if management approval is required. |
| Project | Ensure the correct project is selected for proper cost allocation. |
| Type | Select the order type (e.g., Goods, Services). |
| Currency | Choose the currency in which the transaction will be processed (e.g., MYR, USD). |
| Order Date | Set the official date of the purchase order. |
| Accounts | Select the account to be charged for the purchase. |
| Number of Days Owed | Enter payment terms (e.g., Net 30, Net 60). |
| Discount Type | Select whether discounts are applied as a percentage or fixed amount. |
| Person in Charge | Assign a responsible staff member to oversee the purchase. |
| Sales Invoice | Link to a related sales invoice if necessary. |
| Delivery Date | Set the expected delivery date of goods/services. |
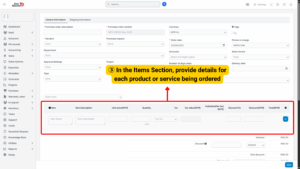
Adding Item Details
In the Items section, specify the products or services being purchased:
| Field | Description |
|---|---|
| Item Name | Choose the product or service being ordered. |
| Item Description | Add details about the item (optional but recommended). |
| Unit Price | Enter the cost per unit of the item. |
| Quantity | Specify how many units are being ordered. |
| Tax | Apply the relevant tax rate (if any). |
| Discount | Enter a percentage discount if applicable. |
| Discount (MYR) | Alternatively, enter a fixed discount amount. |
Automatic Calculation:
The system will automatically calculate Subtotal and Grand Total, factoring in unit prices, quantities, taxes, and discounts.
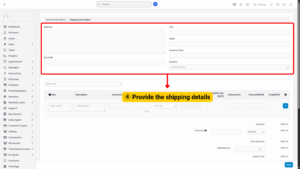
2. Shipping Information
Fill in the shipping details to ensure accurate delivery:
| Field | Description |
|---|---|
| Address | Enter the full shipping address where items will be delivered. |
| Zip Code | Enter the postal code. |
| City | Enter the city of delivery. |
| State | Specify the state or region. |
| Country Code | Enter the ISO country code if required. |
| Country | Select the country name from the list. |
Terms & Conditions
You can include additional Terms & Conditions for the vendor, such as:
– Payment terms
– Delivery requirements
– Warranty details
– Penalties for late delivery
This ensures clarity and prevents disputes later.
Saving the Purchase Order
Once all fields are completed:
1. Review all information carefully to ensure accuracy.
2. Click Save to create the purchase order.
The purchase order will now be listed under the Purchase Order section, where it can be tracked, approved, or shared with vendors.