Project Module – Creating and Managing Projects
The Project Module in BizCore allows you to efficiently manage your organization’s projects from start to finish. This feature helps streamline task assignments, monitor progress, manage billing, and collaborate with clients.
This article provides a step-by-step guide on how to create a new project in BizCore, including configuration options and best practices for project settings.
Accessing the Project Module
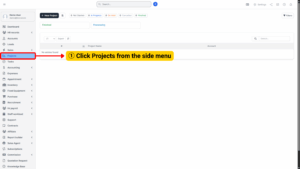
1. From the Main Dashboard, navigate to the Sidebar Menu.
2. Click Projects to open the Project Management workspace.
Creating a New Project
1. Click + New Project located at the top right of the Projects page.
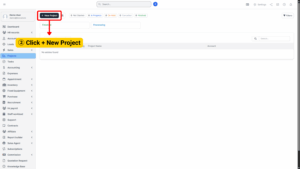
2. You will be directed to the Create Project page, which is divided into two sections:
Project
Project Settings
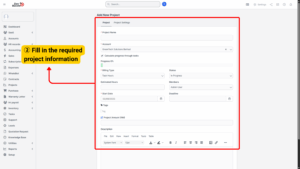
1. Project Section
This section contains the general information and key details for your new project.
| Field | Description |
|---|---|
| Project Name | (Required) Enter a clear and descriptive name for the project. |
| Account | (Required) Select the client account associated with this project. |
| Calculate Progress Through Tasks | Tick to automatically calculate overall project progress based on completed tasks. Untick to manually track progress. |
| Billing Type | Choose the billing type for the project (e.g., Fixed Price, Hourly, or Non-Billable). |
| Status | Set the current status of the project (e.g., Not Started, In Progress, On Hold, Completed). |
| Estimated Hours | Enter the estimated total hours required for project completion. |
| Members | Assign team members responsible for this project. |
| Start Date & Deadline | (Required) Define the project’s start date and deadline to ensure timely delivery. |
| Project Amount (RM) | Enter the total contract amount (if applicable). |
| Description | Provide a detailed project description for internal and client reference. |
| Send Project Created Email | Tick to automatically send an email notification to the client when the project is created. |
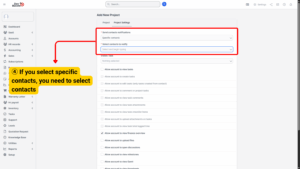
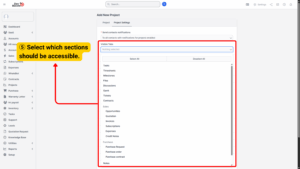
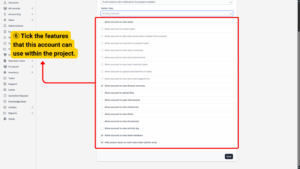
2. Project Settings Section
This section allows you to configure visibility, permissions, and notifications for your project.

| Setting | Description |
|---|---|
| Send Contacts Notifications | Enable to send notifications to the client when there are updates on the project. |
| Visible Tabs | Select which tabs (e.g., Overview, Tasks, Files, Discussions) should be visible to the client. |
| Allow Account to View Tasks | Grant the client permission to view tasks within this project. |
| Allow Account to Create Tasks | Allow the client to add tasks to the project. |
| Allow Account to Edit Tasks | Allows the client to edit tasks they created. |
| Allow Account to Comment on Project Tasks | Enables the client to comment on tasks for better collaboration. |
| Allow Account to View Task Comments | Lets the client view all task-related comments. |
| Allow Account to View Task Attachments | Grants access to attachments uploaded to tasks. |
| Allow Account to View Task Checklist Items | Allows client to view task sub-items or checklists. |
| Allow Account to Upload Attachments on Tasks | Enable to let the client upload attachments. |
| Allow Account to View Task Total Logged Time | Shows total time spent on each task to the client. |
| Allow Account to View Finance Overview | Provides the client access to the project’s financial summary. |
| Allow Account to Upload Files | Gives the client permission to upload project-related files. |
| Allow Account to Open Discussions | Allows the client to initiate discussions within the project. |
| Allow Account to View Milestones | Lets the client see project milestones. |
| Allow Account to View Gantt | Grants access to Gantt chart view for timeline visualization. |
| Allow Account to View Timesheets | Allows the client to see logged timesheets. |
| Allow Account to View Activity Log | Enables the client to view the project’s activity history. |
| Allow Account to View Team Members | Displays assigned project team members to the client. |
| Hide Project Tasks on Main Tasks Table (Admin Area) | Tick this to hide project tasks from appearing in the main task table for admins. |
Saving the Project
Once all fields and settings have been configured:
1. Review the information entered for accuracy.
2. Click Save to create the project.
Your project will now appear in the Projects list, and relevant team members or clients will be notified (if enabled).