Sub Group Settings Guide
This guide explains how to configure and manage Sub Groups in the Inventory module. Sub Groups help in organizing and categorizing inventory items more precisely under their respective Commodity Groups. The configured sub groups will appear in the Sub Group combobox on the Add/Edit Item page.
1. Adding a New Sub Group
To add a new sub group to your organization:
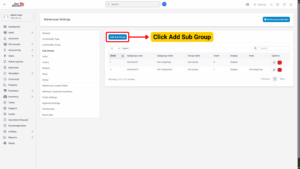
Step 1: Access Settings
– Go to the Settings menu under the Inventory module from the left sidebar.
Step 2: Open Sub Groups
– Select Sub Groups from the settings list.
– Click on the “Add Sub Group” button.
Step 3: Enter Sub Group Details
Fill in the required fields on the Add Sub Group page:
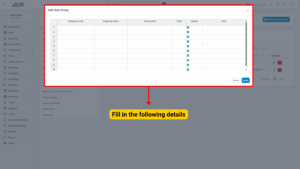
| Field | Description | Example |
|---|---|---|
| Subgroup Code | A unique identifier for the subgroup. | SG-001 |
| Subgroup Name | The descriptive name of the subgroup. | Electronics Accessories |
| Group Name | Double-click to select the group name from the list. The list is pulled from Commodity Group settings. Only groups marked as Display will appear. | Electronics |
| Order | Determines the display order in the dropdown list. Subgroups with smaller numbers will appear first. | 1 |
| Display | If checked, the subgroup will be visible in the dropdown list on the Add/Edit Item page. If unchecked, it will be hidden. | ✔ Display |
| Note | Additional notes or remarks regarding the subgroup. | “Used for small electronic accessories.” |
Step 4: Save the Sub Group
– Click the Save button to create the new sub group.
– The newly created sub group will now be available in the Sub Group combobox.

2. Editing an Existing Sub Group
To modify the details of an existing sub group:
Step 1: Access Settings
– Navigate to the Settings menu under the Inventory module.
Step 2: Select and Edit
– Select Sub Groups from the settings list.
– Hover over the sub group you want to modify and click Edit.
Step 3: Update Details
– Make the necessary changes to the sub group details (e.g., name, order, display settings).
Step 4: Save Changes
– Click the Save button to apply the updates.
3. Deleting a Sub Group
If a sub group is no longer needed, it can be deleted from the system.
Step 1: Access Settings
– Go to the Settings menu under the Inventory module.
Step 2: Select and Delete
– Select Sub Groups from the settings list.
– Hover over the sub group to be deleted and click Delete.
Step 3: Confirm Deletion
– A confirmation pop-up will appear. Click Confirm to finalize the deletion.
– The sub group will be permanently removed from the system.
4. Important Notes
– Only users with the appropriate permissions can add, edit, or delete sub groups.
– Sub groups are linked to their parent Commodity Group. If a commodity group is hidden or deleted, its associated sub groups may also be affected.
– Deleting a sub group does not affect historical transaction data but removes it from the item creation and selection dropdown.