Receipt Return Order Documentation
Overview
Receipt Return Order is a feature used to manage the process of importing stock back into inventory after a customer returns goods. Returns can come from Sales Return Orders or Inventory Delivery Vouchers.
This process helps maintain accurate stock levels, ensure proper traceability of returned goods, and streamline after-sales operations.
The system supports:
– Full or partial return of delivered items
– Automatic generation of inventory receiving vouchers
– Approval workflows for controlled return processing
1. Prerequisites
Before creating a Receipt Return Order:
– Ensure you have user permission to access the Inventory module.
– The return policy must be configured in Settings → General → Receiving – Exporting Return Order → Return policies information.
– If required, set up an approval process for Receipt Return Orders under Approval Settings.
– Relevant sales return orders or delivery vouchers should already exist in the system.
2. Create Receipt Return Order
Step 1. Configure Approval Process (Optional)
– Navigate to Settings → Approval Settings.
– Create an approval flow for Receiving – Exporting Return Order.
– Assign approvers and notification rules.
Tip
If approval is not required, the return can be processed immediately after saving.

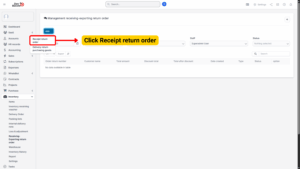
Step 2. Access the Receipt Return Order Menu
– Go to Inventory module from the left sidebar.
– Select Receiving – Exporting Return Order.
– Click Add.
– Choose Receipt Return Order.
Step 3. Fill in the Required Details
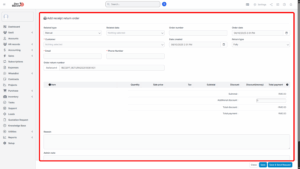
| Field | Description |
|---|---|
| Related Type | Select the reference type: Manual or Sales Return Order. |
| Related Data | – If Manual: Select an existing Inventory Delivery Voucher.
– If Sales Return Order: Select a valid Sales Return Order (each Sales Return Order can only generate one Receipt Return Order). |
| Order Number | Auto-filled with the selected Delivery Voucher code (if Manual). Remains blank if Sales Return Order is selected. |
| Order Date | Automatically set to the current date and time. |
| Customer | Auto-filled based on the selected reference document. |
| Email / Phone Number | Auto-filled from the selected customer information. |
| Date Created | Automatically set to the current date and time. |
| Return Type | – Fully: Full quantity return of all items in the reference.
– Partially: Partial return (allows item removal from the list). |
| Order Return Number | Auto-generated document number based on the prefix setting. |
| Item Detail | Items and quantities retrieved from the reference document (Delivery Voucher or Sales Return Order). |
| Reason | Required field to specify the reason for return (e.g., damaged item, wrong product, warranty, etc.). |
| Admin Note | Optional note for internal or admin reference. |
| Return Policies Information | Automatically fetched from Settings. Displays applicable return policy text. |
Note
When partial return is selected, you can manually adjust which items and quantities are returned.

Step 4. Save the Receipt Return Order
– Save → Saves the document without initiating approval.
– Save & Send Request → Saves and sends the document for approval (if approval flow exists).
Step 5. Approving the Receipt Return Order
Once the Receipt Return Order is approved, the system automatically generates an Inventory Receiving Voucher.
There are two scenarios:
1. Case 1: No approval required for Inventory Receiving Voucher
a) If a default warehouse for return orders is set in Settings, the system:
– Automatically approves the inventory receiving voucher.
– Adds returned stock to the selected default warehouse.
b) If no default warehouse is set:
– The system automatically creates a new warehouse to store the returned goods.
– The inventory receiving voucher is approved automatically.
2. Case 2: Inventory Receiving Voucher requires approval
– The inventory receiving voucher will be created in Draft status.
– You may change the warehouse in the Edit Inventory Receiving Voucher page.
– Then submit and approve the voucher manually.
3. Edit Receipt Return Order
Steps:
1. Navigate to Receiving – Exporting Return Order under Inventory module.
2. Select the return order.
3. Click Edit.
4. Make necessary updates (e.g., return type, items, notes).
5. Click Save to apply the changes.
4. Delete Receipt Return Order
Steps:
1. Go to Receiving – Exporting Return Order.
2. Select the record.
3. Click Delete.
4. Confirm the deletion in the pop-up prompt.
5. Receipt Return Order Detail View
1. Select a Receipt Return Order and click 👁 View.
2. From this page, you can:
– Review customer and return details.
– Check item list and returned quantities.
– View approval history and document status.
– Print, Download as PDF, or Export the document for record keeping.
6. Inventory Impact
| Return Type | System Action | Stock Effect |
|---|---|---|
| Fully Return | All items from the reference document are received back. | Stock is increased fully in the warehouse. |
| Partially Return | Only selected items are received back. | Stock is increased by returned quantities only. |
– The Inventory History module logs the transaction for traceability.
– Serial numbers (if applicable) are also returned to stock and made available for future delivery.