Item Management Guide: Create, Update & Delete Items
Overview
The Item Management function is used to create, edit, and delete products that will be used across multiple business modules, including Sales, Purchase, Inventory, and Manufacturing.
An Item serves as the core element of your product catalog, allowing you to manage stock, pricing, tax rates, variations, and custom attributes in one centralized location.
1. Creating an Item
Creating an item allows you to add a new product to your system. This product can then be used for transactions such as sales orders, purchase orders, manufacturing processes, or inventory tracking.
Step-by-Step Instructions
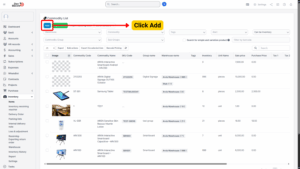
Step 1: Navigate to Item Page
– Go to the Inventory module on the left sidebar.
– Select the Items menu.
Step 2: Add a New Item
– Click the “Add” button at the top right of the page.
Step 3: Fill in Item Details
You will be directed to the Add Item page. Fill out the following fields:
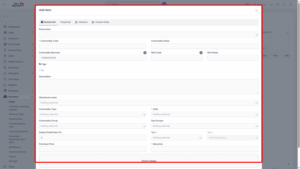
| Field | Description |
|---|---|
| Parent Item | Select an existing item to act as the parent for variations or bundles. (Optional) |
| Commodity Code | A unique, manually entered identifier. Must be unique — duplication is not allowed. |
| Commodity Name | The full descriptive name of the item. |
| Commodity Barcode | Automatically generated with a 13-digit numeric code. Letters or special characters are not allowed. |
| SKU Code | Internal code for inventory tracking. |
| SKU Name | Automatically copied from the Commodity Name. |
| Tags | Add keywords for easier search and categorization. |
| Description | Add detailed product specifications, packaging information, and usage notes. |
| Warehouse Name | (Optional) Select a warehouse for internal reference. |
| Commodity Type | Choose a type from the Commodity Type settings. |
| Units | Select a unit of measure (e.g., pcs, box, kg). |
| Commodity Group | Choose a group to classify the item. |
| Sub Groups | Select a subgroup for finer classification. |
| Tax 1 / Tax 2 | Choose applicable tax rates (e.g., VAT, GST). |
| Default Profit Rate (%) | The default markup to calculate sale price from purchase price. (e.g., 100 + 20% = 120) |
| Purchase Price | Cost at which the item is procured. |
| Sale Price | Final selling price. |
Note
To manually set the price:
1. Set Default Profit Rate = 1
2. Enter Purchase Price
3. Manually enter Sale Price

Step 4: Attach Product Images
– Upload item images to make it easily identifiable in listings and transactions.
2. Properties Tab
This section defines the additional product attributes and operational behavior.
| Property | Description |
|---|---|
| Origin | Specify the manufacturing or sourcing country. |
| Styles | Select product style (e.g., Casual, Sport, Luxury) from Settings → Styles. |
| Model | Choose the product model/version from Settings → Models. |
| Sizes | Define size category (e.g., S, M, L, 30x40cm) from Settings → Sizes. |
| Color | Select product color from Settings → Colors. |
| Warranty (month) | Specify warranty duration. A notification will be sent to the admin when it expires. |
| Do not update inventory numbers | Enable if the product is not stock-managed (no inventory movement required). |
| Can be sold | Allow usage in Sales and Affiliate modules (discount/commission setup). |
| Can be manufacturing | Allow usage in Manufacturing module only. |
| Can be purchased | Allow usage in Purchase module only. |
| Can be Inventory | Allow usage in Inventory module only. |
| Long Description | Provide in-depth details such as usage instructions, materials, certifications, or safety notes. |
3. Variations Tab
You can define product variations based on attributes like size, color, memory, or configuration.
– Click “+” to add a new Variant Name and Variant Options.
– Click “-” to remove an existing line.
– Once an item is created, variant attributes cannot be added or removed.
Example:
Product: MacBook Air 13” 2020 M1
– Variant Name: Memoryzone
– Variant Options: 256GB, 512GB
Variants created:
– MacBook Air 13” 2020 M1 256GB
– MacBook Air 13” 2020 M1 512GB
4. Custom Fields Tab
Displays all custom fields that have been created in Custom Field Settings for items. These fields allow businesses to store additional product data tailored to their specific needs.
5. Editing an Item
Once an item is created, you can update its details except for variant attributes.
Step-by-Step Instructions
1. Go to Inventory → Items.
2. Hover over the item you want to edit and click Edit.
3. Modify the necessary fields. (Note: Variant structure cannot be changed.)
4. Click Save to apply changes.
6. Deleting an Item
You can delete single or multiple items.
If an item has variants, the variant items must be deleted first, then the parent product.
Single Item Deletion
1. Hover over the item you wish to delete.
2. Click Delete.
3. Confirm deletion in the pop-up dialog.
Bulk Deletion
1. Select multiple items using the checkbox.
2. Click Bulk Action.
3. Select Mass Delete and confirm.
Note
Deleting an item is permanent and will remove it from all active transaction lists.