Approval Settings
The Approval Settings feature allows administrators to configure and manage approval workflows for various types of inventory transactions. This ensures that all key inventory activities are reviewed, approved, and signed off by authorized personnel before being finalized.
Approval workflows can be configured for both single-person and multi-person approval and signature processes, ensuring flexibility and compliance with organizational procedures.
1. Supported Transaction Types
Approval workflows can be created for the following transaction types:
– Inventory Receiving Voucher
– Inventory Delivery Voucher
– Internal Delivery Note
– Loss & Adjustment
– Packing List
– Order Return
These workflows ensure proper review, approval, and signature before any inventory record is officially processed.
2. Types of Approval Processes
a) Approval Process for 1 Person
When a transaction (ticket) is created and an approval request is submitted, the assigned approver will receive:
– A web notification, and
– An email notification requesting approval.
Only the person designated in the approval process can approve the ticket.
Once the approval is completed, a notification is sent to the ticket creator confirming the status.
Example: When a receiving voucher is created, the warehouse manager receives an approval request and must approve it before further processing.
Note
Example:
When a receiving voucher is created, the warehouse manager receives an approval request and must approve it before further processing.

b) Signature Process for 1 Person
Once a transaction is created and submitted for signature, the assigned signer receives:
– A web notification, and
– An email notification requesting their signature.
Only the designated signer can sign the form.
A notification is sent to the ticket creator after the signature is completed.
✅ Example: A supervisor is required to sign off the delivery voucher to validate the shipment.
Note
Example:
A supervisor is required to sign off the delivery voucher to validate the shipment.
c) Approval Process for Multiple People
When a ticket is created and the approval request is submitted:
– Only the first person in the approval sequence receives the notification (web & email).
After the first person approves, the next person in the process receives the approval notification.
If the first person rejects, the next person will:
– Not receive any notification, and
– The approval button will not be shown in the ticket details.
Only users included in the process have the authority to approve.
Note
Example:
Step 1: Supervisor approves the voucher.
Step 2: Finance manager receives the next approval request.
Step 3: If supervisor rejects, the process stops.
d) Signature Process for Multiple People
After a transaction is created and approved:
– Only the first signer receives the web & email notification.
Once the first person signs, the next person in the process receives the signature request.
If the first person does not sign, the next person does not receive any notification, and the sign button will not be displayed in the ticket.
Only users in the process can sign the document.
Note
Example:
Step 1: Head of Department signs the receiving slip.
Step 2: Director signs after Step 1 is completed.
e) Combined Approval & Signature Process for Multiple People
When the transaction is created and submitted:
– The first person in the sequence receives the approval/sign request.
Once the first person approves/signs, the next person receives the request.
If the first person rejects or does not sign, the next person will:
– Not receive any notification, and
– The approve/sign button will not appear in the ticket details.
Only the users included in the process can approve or sign.
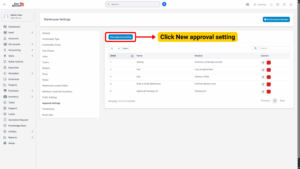
3. Adding a New Approval Setting
To add a new approval workflow:
Step 1: Go to Settings under the Inventory module from the left sidebar.
Step 2: Select Approval Settings → Click on the New Approval Setting button.
Step 3: Fill in the following details:
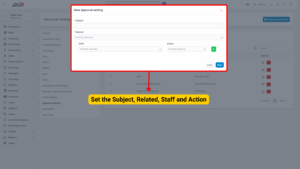
– Subject: Enter a descriptive title for the approval setting.
– Related: Select the transaction type (Inventory Receiving Voucher, Inventory Delivery Voucher, Internal Delivery Note, Loss & Adjustment, Packing List, Order Return).
– Select Staff: Choose the staff member(s) responsible for approval/signature.
– Select Action: Choose whether the person’s action is to Approve or Sign.
– Click + to add another approver to the process.
– Click rubbish icon to remove an approver from the process.
Step 4: Click Save to create the new approval workflow.
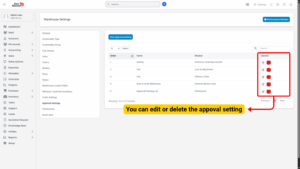
4. Editing an Existing Approval Setting
To edit an approval workflow:
Step 1: Go to Settings under the Inventory module.
Step 2: Select Approval Settings.
Step 3: Select the approval setting you want to edit → Click Edit.
Step 4: Make the necessary changes.
Step 5: Click Save.
✅ Tip: You can reorder or update approvers at any time, but existing approval requests will follow the workflow active at the time of submission.
Tip
You can reorder or update approvers at any time, but existing approval requests will follow the workflow active at the time of submission.

5. Deleting an Approval Setting
To delete an approval workflow:
Step 1: Go to Settings under the Inventory module.
Step 2: Select Approval Settings.
Step 3: Select the approval setting you want to delete → Click Delete.
Step 4: Confirm your action in the pop-up dialog.
– The approval workflow will be permanently removed from the system.
Note
Deleting an approval setting does not affect transactions that have already been approved or signed.
6. Notifications and Actions
– All approvers and signers receive real-time web notifications and email alerts.
– Only assigned personnel can take action (approve/sign) on the ticket.
– Ticket creators are automatically notified after approval/signature completion.
– If an approver rejects the request, the process ends, and subsequent users will not receive notifications.