Commodity Group Settings Guide
This document provides step-by-step instructions on how to configure and manage Commodity Groups within the Inventory module. Commodity Group settings allow users to organize and categorize items effectively. The configured groups will be displayed in the Commodity Group combobox on the Add/Edit Item page.
1. Adding a New Commodity Group
To add a new commodity group to your organization:
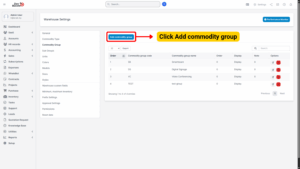
Step 1: Access Settings
– Navigate to the Settings menu under the Inventory module from the left sidebar.
Step 2: Open Commodity Group
– Select Commodity Group from the settings list.
– Click on the “Add commodity group” button.
Step 3: Enter Commodity Group Details
Fill in the required fields on the Add Commodity Group page:
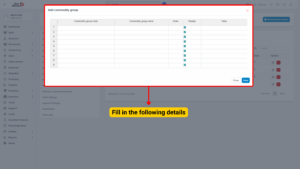
1. Commodity group code – Enter a unique code for the commodity group.
2. Commodity group name – Enter the name of the commodity group.
3. Order – Specify the display order. Commodity groups with a smaller number will appear at the top of the dropdown list.
4. Display:
– Checked: The commodity group will be visible in the dropdown list on the Add/Edit Item page.
– Unchecked: The commodity group will be hidden.
5. Note – Add any additional notes if necessary.
Step 4: Save the Commodity Group
– Click the Save button to complete the process.
– The new commodity group will now appear in the Commodity Group combobox.
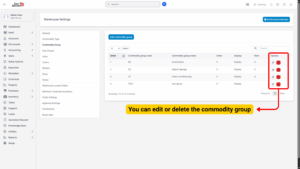
2. Editing an Existing Commodity Group
To modify the details of an existing commodity group:
Step 1: Access Settings
– Go to the Settings menu under the Inventory module.
Step 2: Select and Edit
– Select Commodity Group from the settings list.
– Hover over the commodity group you want to modify and click Edit.
Step 3: Update Details
– Make the necessary changes to the commodity group details.
Step 4: Save Changes
– Click the Save button to apply the updates.
3. Deleting a Commodity Group
If a commodity group is no longer in use, it can be permanently removed.
Step 1: Access Settings
– Go to the Settings menu under the Inventory module.
Step 2: Select and Delete
– Select Commodity Group from the settings list.
– Hover over the commodity group to be removed and click Delete.
Step 3: Confirm Deletion
– A confirmation pop-up will appear. Click Confirm to finalize the deletion.
– The commodity group will be permanently removed from the system.
4. Important Notes
– Only users with appropriate permissions can add, edit, or delete commodity groups.
– Deleting a commodity group will remove it from the dropdown selection but will not affect historical transaction records.
– It is recommended to review and confirm dependencies before deleting a commodity group to avoid misclassification of items.