Ticket Support in BizCore
The Ticket Support module in BizCore provides a streamlined way to manage customer inquiries, complaints, and service requests. By creating and managing support tickets, businesses can ensure prompt responses, proper tracking, and efficient resolution of client issues.
Creating a New Ticket
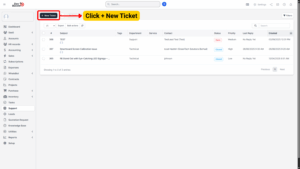
To create a new support ticket:
1. Navigate to Support
– From the sidebar menu, click Support → New Ticket.
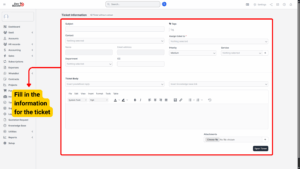
2. Fill in Ticket Details
Complete the required fields:
| Field | Description |
|---|---|
| Assignee | By default, the ticket is assigned to you. You can assign it to another staff member or set it to None. |
| Customer | Select the customer for whom the ticket is being created. |
| Department | Choose the department responsible for handling this ticket. |
| Priority | Define the urgency: Low, Medium, High, or Urgent. |
| Subject | Add a clear and descriptive subject line. |
| Message | Provide the detailed description of the issue or request. |
3. Preview Email Address
The To and Email Address fields are auto-filled.
These are for preview purposes only and are not editable.
4. Save the Ticket
Once completed, click Save to create the ticket.
What Happens After Ticket Creation
– The customer receives an email notification informing them that a new ticket has been created.
– The email template used is configurable under:
Setup → Email Templates → New Ticket Opened (Admin).
– This template defines the content sent to clients when tickets are opened from the admin area.
If the ticket was assigned to another staff member, that staff member will receive a notification about the assignment.
Working With Tickets
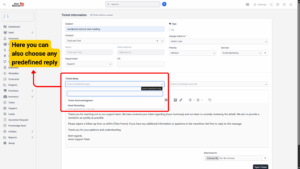
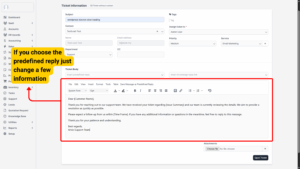
1. Replying to a Ticket
a) Open the ticket from the support list.
b) Use the reply area to type a response to the client.
c) To enrich your reply with helpful resources, click the Insert Knowledge Base Link button:
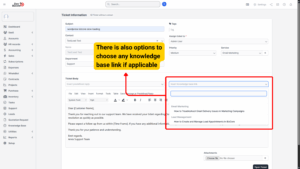
– A popup modal will appear.
– Click the plus (+) icon next to the desired article.
– The knowledge base link will be inserted where your cursor is in the reply field.
⚠️ Note: This option is only available if Setup → Settings → Customers → Use Knowledge Base is set to Yes.
2. Changing Ticket Status
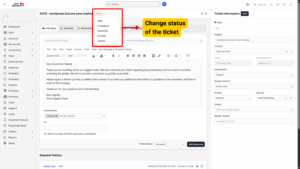
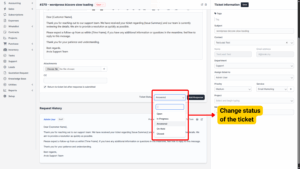
a) Open the ticket.
b) On the top right corner, select the desired status from the dropdown.
c) The status updates automatically — no need to save.
❗ No email notification will be sent to the customer when the ticket status changes.
Ticket Statuses
Ticket statuses allow you to track the progress of an issue. Common statuses include:
Open – Newly created, awaiting staff action.
In Progress – Being handled by staff.
On Hold – Pending further information or awaiting customer response.
Resolved/Closed – Issue resolved and ticket closed.