Organizational Chart (Org Chart) in HR Records
The Org Chart feature in the HR Records module provides a clear and structured visualization of an organization’s hierarchy. It helps HR administrators and management teams understand how departments, units, and employees are organized.
This feature allows users to create, manage, and visualize organizational units (departments). The information added in this section will also synchronize automatically with the Departments screen located in the Support menu of the Setup module, ensuring consistency across the system.
Units
The Units screen is used to create and manage organizational departments or units. Each unit represents a department or sub-department within the company structure.
This ensures all employee profiles and reporting relationships are properly aligned within the system.
Create New Unit
Purpose:
To add a new department or organizational unit to the HR system.
Steps:
1. Navigate to Org Chart → Add New Unit.
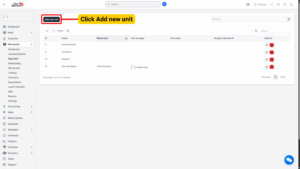
2. The system will open the Add New Unit screen.
3. Enter all the required data fields:
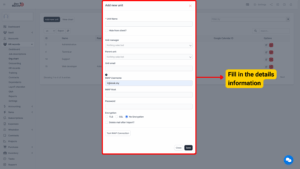
| Field Name | Description |
|---|---|
| Unit Name | Enter the name of the new department or unit. |
| Code | Enter a unique code for the department (optional, depending on configuration). |
| Parent Unit | If the new unit is a sub-department, select its parent unit (optional). |
| Description | Add any additional details or remarks about the unit (optional). |
4. Once all information is entered:
– Click Save to store the new unit in the system.
– Click Close to cancel the action and exit the screen without saving.
After saving, the new unit will appear in the Org Chart list and will also be synchronized automatically with the Department screen under the Support menu of Setup.
Edit Unit
Purpose:
To modify or update the details of an existing department or unit.
Steps:
1. On the Org Chart screen, locate the unit that needs to be updated.
2. Select the Edit icon corresponding to that data line.
3. The system will display the Edit Unit screen containing the current unit information.
4. Make the necessary changes to fields such as:
– Unit Name
– Parent Unit
– Description
5. Click Save to confirm and apply the changes.
– Alternatively, click Close to cancel without saving.
The updated information will immediately reflect in both the Org Chart display and the Departments screen under the Setup menu.
Delete Unit
Purpose:
To remove an existing unit or department that is no longer part of the organization.
Steps:
1. On the Org Chart screen, locate the department/unit to be removed.
2. Select the Delete icon corresponding to that data line.
3. The system will display a confirmation message to prevent accidental deletion.
– Click OK to confirm and permanently delete the unit.
– Click Cancel to abort the operation.
Note
If the deleted unit has associated sub-units or employees, ensure that those records are reassigned before deletion to prevent data inconsistencies.

View Chart
Purpose:
To visualize the organizational hierarchy of departments and their relationships within the company.
Steps:
1. Navigate to Org Chart → View Chart.
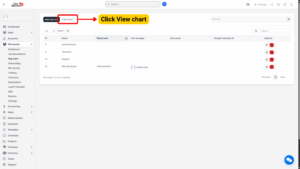
2. The system will display the Organizational Chart, illustrating all units and their hierarchical connections.
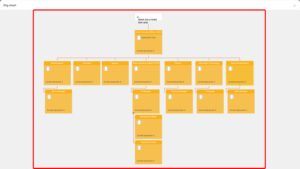
Features of the View Chart screen:
– Displays each department as a node within the hierarchy.
– Shows parent–child relationships between units.
– Allows users to expand or collapse branches for better visibility.
– Provides quick access to department details by selecting a unit within the chart.
The chart provides a real-time visualization of the organization’s structure, allowing HR teams and management to monitor relationships between departments efficiently.