Job Descriptions Menu in HR Records
The Job Descriptions menu in the HR Records module is used to create, manage, and organize job positions within the organization. This feature ensures that all job titles and groups are properly structured for easy reference across the HR system. When a candidate successfully passes an interview and is transferred to the HR Record module, their job position will automatically synchronize with the Job Descriptions screen.
If the position does not yet exist in the Job Descriptions list, the system will create a new entry. However, if a matching job position already exists, the data will remain unchanged.
Group Management
Job positions are categorized under specific Groups. Each job position must belong to one group. Managing groups helps to organize job titles based on department, hierarchy, or function.
Create New Group
Purpose:
To create a new position group that will be used when assigning job positions.
Steps:
1. Go to Menu → Job Descriptions → Groups.
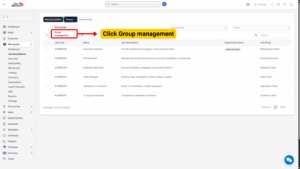
2. Select New Group, or go to Group Management → New Position Group.
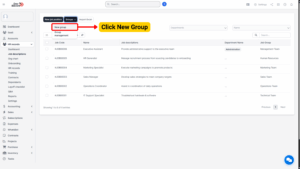
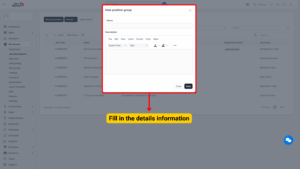
3. The system will open the New Position Group screen.
4. Enter the required data fields:
| Field Name | Description |
|---|---|
| Group Name | Enter the name of the job group. |
| Group Description | Optionally describe the group’s purpose or coverage area. |
5. Click Save to save the new group.
Alternatively, click Close to cancel and exit without saving.
Edit Group
Purpose:
To modify existing job group details when updates are needed.
Steps:
1. Navigate to Menu → Job Descriptions → Group → Management Group.
2. Select the data line (group) you wish to edit.
3. Click the Edit button.
4. The system will display the Edit Group screen.
5. Make the necessary changes to the group information.
6. Click Save to confirm the edits.
Click Close to cancel the operation without saving.
Delete Group
Purpose:
To remove an existing job group that is no longer required.
Steps:
1. Go to Menu → Job Descriptions → Group → Management Group.
2. Select the group to delete.
3. Click the Delete function.
4. The system will display a confirmation message.
– Click OK to confirm and delete the selected group.
– Click Cancel to abort the deletion process.
Job Position Management
Each job position represents a specific working role within the organization. Positions are linked to job groups and departments for better structure and integration with employee profiles.
Create New Job Position
Purpose:
To create new job position entries that can be used when assigning employee roles.
Steps:
1. Navigate to Menu → Job Descriptions → New Job Position.
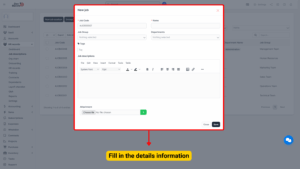
2. The system will display the New Job screen.
3. Enter the required information in each field:
| Field Name | Description |
|---|---|
| Job Code | Enter a unique code for the job position. |
| Name | Enter the official name of the working position. |
| Job Group | Select the appropriate job group from the list. (Data is taken from the Groups created in Section 1.1.) |
| Department | Select the department associated with this position. (Data is retrieved from the Departments screen under the Support menu in Setup.) |
4. Click Save to store the information.
– Click Close to cancel and exit the screen without saving.
Import Job Positions via Excel
Purpose:
To upload multiple job positions into the system efficiently using an Excel file.
Steps:
1. Navigate to Menu → Job Descriptions → Import Excel.
2. The system will open the Import Job Position screen.
3. Perform the following actions:
– Click Download Sample File (1) to download the Excel template.
– Fill in the required job data in the sample file.
– Upload the completed file to the system using the Choose File (2) button.
– Click Import (3) to begin the import process.
4. If the uploaded file contains errors:
– The system will display a notification.
– Click Download Error File to review and correct the mistakes.
– After correction, re-upload the file and select Import again.
Edit Job Position
Purpose:
To update information for an existing job position.
Steps:
1. From the Job Descriptions screen, locate the job position you wish to edit.
2. Select the corresponding data line.
3. Click Edit.
4. Update the necessary details in the Edit Job screen.
5. Click Save to confirm the changes.
Delete Job Position
You can delete job positions individually or in bulk, depending on your requirements.
Method 1: Delete Single Job Position
Steps:
1. At the Job Descriptions screen, select the job position to delete.
2. Click the Delete button.
3. The system will display a confirmation message.
– Click OK to confirm and remove the selected record.
– Click Cancel to abort the deletion.
Method 2: Bulk Delete (Multiple Job Positions)
Steps:
1. In the Job Descriptions screen, select multiple job positions using the checkboxes.
2. Click the Bulk Actions button.
3. The Bulk Action screen will appear.
4. Choose Mass Delete to delete all selected records.
5. Click Confirm to proceed.
6. The system will display a confirmation message:
– Click OK to finalize deletion.
– Click Cancel to stop the operation.
Method 3: Delete All Data
Steps:
1. At the Job Descriptions screen, select the option to Display All Data.
2. Tick the checkbox at the top to select all entries.
3. Click the Bulk Actions function.
4. In the Bulk Action screen, select Mass Delete.
5. Click Confirm to proceed.
6. The system will show a confirmation message:
– Click OK to permanently delete all selected records.
– Click Cancel to cancel the action.