Employee Layoff Process in HR Records
The Employee Layoff Process in the HR Records module helps HR departments manage and record employee resignations or terminations in a systematic and transparent manner. Through this process, the organization ensures that all necessary steps, responsibilities, and approvals are completed before an employee’s account is deactivated.
This document explains the complete flow of creating, configuring, and updating the employee layoff process in the system.
Overview
The layoff process is used to handle employee separation activities such as resignations, contract terminations, or layoffs. It ensures that:
– All exit procedures are followed.
– Relevant departments complete their responsibilities.
– Employee access is properly revoked after approval.
The process consists of several stages — from checklist setup to process completion and approval.
Process Flow
| Step | Action | Description |
|---|---|---|
| 1 | Create Layoff Checklist | Define the standard steps for the employee layoff process. |
| 2 | Configure Checklist Details | Assign tasks and responsibilities for each step. |
| 3 | Create a New Layoff Record | Apply the checklist to specific employees who are leaving. |
| 4 | Update Resignation Progress | Track and update each step of the process. |
| 5 | Approve and Deactivate Account | Complete the process and automatically disable employee login. |
Step-by-Step Instructions
Step 1: Create Layoff Checklist
1. Navigate to:
HR Records Module → Settings → Layoff Checklist → Add
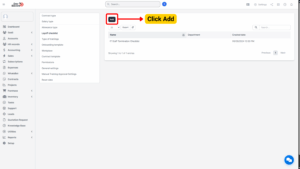
2. The system will open the Add Layoff Checklist screen.
3. Enter all necessary data, such as:

– Checklist Name
– Applicable Department (if any)
4. Click Save to store the data and proceed to the configuration screen.
To cancel the action, click Close.
A new layoff checklist entry will be created and displayed in the Layoff Checklist list.
Step 2: Configure Layoff Checklist
After saving the checklist, the system will automatically open the Configure Layoff Checklist screen.
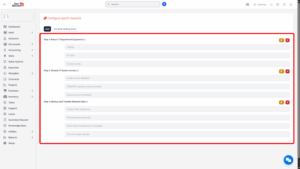
1. To add a step to the process, select the Add Step function.
2. To return to the main Layoff Checklist screen without adding steps, select Back.
Step 3: Add Steps to the Layoff Process
When adding a new step:
1. The system will display fields such as:
Step Name: (e.g., Return Company Assets, Exit Interview, Final Payroll)
Person in Charge: Select the employee or department responsible for completing the step.
2. After entering the details, click Save to store the configuration.
Note
The Person in Charge field retrieves data from the HR Record menu within the HR Profile module.
The selected individual will have the right to update resignation information relevant to their assigned step.

All defined steps will appear in the layoff checklist process and can later be tracked during execution.
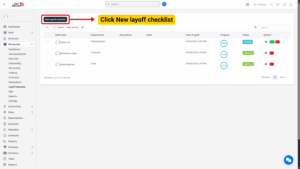
Step 4: Create a New Layoff Record
Once the checklist has been defined, proceed to initiate a new layoff process for an employee.
1. Navigate to:
HR Records Module → Layoff Checklist → New Layoff Checklist
2. The system will open the New Layoff Checklist screen.
3. Enter required data such as:
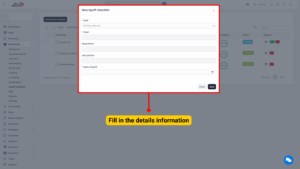
| Field Name | Description |
|---|---|
| Employee Name | Select the employee who is resigning or being laid off. |
| Effective Resignation Date | Specify the date when the resignation or layoff becomes effective. |
| Checklist Type | Select the checklist type from previously configured templates to guide the layoff or resignation process. |
| Reason for Layoff or Resignation | Provide the reason or explanation for the employee’s layoff or resignation. |
4. Click Save to confirm the operation or Close to cancel it.
Step 5: Update the Resignation Process
1. Go to the Layoff Checklist screen.
2. Select the record you wish to update and click View Details.
3. The system will display the checklist with all steps created during configuration.
4. Mark each step as completed once the responsible person finalizes their task.
5. Click Save to update the progress. To cancel any modification, click Close.
The system will track the progress of each step until the process reaches 100% completion.
Step 6: Final Approval and Account Deactivation
Once all steps in the resignation process are marked as completed (100%):
1. Select the Approve function.
2. The system will change the status of the record to Approved.
3. The employee’s account will be automatically deactivated, preventing further system access.
Note
This step ensures that all access rights are revoked immediately upon completion of the layoff process, maintaining system security and compliance.