Sales Module – Invoices
The Invoices feature in BizCore enables businesses to generate and manage formal billing documents for customers. An invoice specifies products or services delivered, along with quantities, pricing, discounts, taxes, and payment terms. It is a crucial step in the sales cycle, ensuring accurate payment requests and proper financial tracking.
With BizCore, invoices are automatically calculated, can be set to recur, and allow flexible payment options to streamline the billing process.
This article explains how to create, configure, and manage invoices within the Sales Module, including item entry, discounts, payment settings, and best practices.
Accessing the Invoice Section
To create or manage invoices:
1. From the Main Dashboard, click Sales in the sidebar menu.
2. Select Invoices.
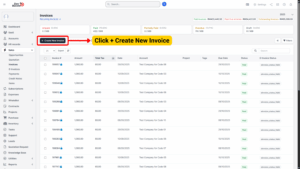
3. You will see a list of all invoices, showing details such as invoice number, customer account, status, due date, and balance.
4. To create a new invoice, click + Create New Invoice.
Creating a New Invoice
Follow these steps to create a new invoice:
1. In the Invoices section, click + Create New Invoice.
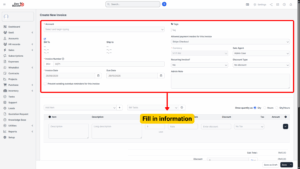
2. Fill in all relevant invoice details.
Invoice Details
Each field allows you to define invoice information according to customer and billing requirements:
| Field | Description |
|---|---|
| Account (Required) | Select the customer account being billed. |
| Bill To | Enter the billing address details for the customer. |
| Ship To | Enter the shipping address (if applicable). |
| Invoice Number (Required) | The system auto-generates a unique invoice number, but it can be customized if needed. |
| Invoice Date (Required) | Select the date the invoice is issued. |
| Due Date | Define the payment due date (e.g., 30 days from invoice date). |
| Prevent Sending Overdue Reminders | Tick this option if you don’t want automatic overdue reminders sent for this invoice. Untick to allow reminders. |
| Allowed Payment Modes | Choose the payment methods accepted for this invoice (e.g., bank transfer, card, cash). |
| Currency (Required) | Select the transaction currency (e.g., MYR, USD). |
| Sale Agent | Assign the staff member responsible for this invoice. |
| Recurring Invoice? | Tick if this invoice should automatically recur at regular intervals (e.g., monthly subscription). |
| Discount Type | Select how discounts will be applied: No Discount, Before Tax, or After Tax. |
| Admin Note | Enter any internal notes for administrators or finance staff (not visible to customers). |
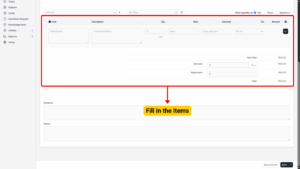
Adding Items to the Invoice
After entering invoice details, you can add itemized billing information.
| Field | Description |
|---|---|
| Item | Select or enter the product/service being billed. |
| Description | Provide details of the item or service. |
| Qty | Enter the quantity delivered. |
| Rate | Enter the unit price. |
| Discount | Apply item-level discounts (if applicable). |
| Tax | Select the tax rate to apply. |
The system will automatically calculate the Sub-Total.
Applying Discounts and Adjustments
Once all items are added:
– Apply an Overall Discount (percentage or fixed amount).
– Add any Adjustments (e.g., additional service fees or manual corrections).
The system automatically recalculates the Grand Total.
Managing Invoice Details After Creation
Once an invoice is saved, it can be managed further:
| Action | Description |
|---|---|
| Update Status | Change the status (Draft → Sent → Paid → Cancelled). |
| Edit Invoice | Modify customer information, items, or payment terms if needed. |
| Record Payments | Track full or partial payments against the invoice. |
| Attach Files | Upload contracts, receipts, or supporting documents. |
| Prevent Overdue Reminders | Adjust reminder settings if necessary. |
| Convert Invoice | Recurring invoices will automatically generate based on defined schedules. |
Saving the Invoice
Once all fields are completed:
1. Review the invoice for accuracy, including items, totals, payment terms, and due date.
2. Click Save.
The invoice will now appear in the Invoice List, where it can be sent to customers, tracked, and updated until fully paid.