Sales Module – Opportunities
The Opportunities feature in BizCore helps sales teams capture, track, and manage potential sales deals in a structured way. By recording opportunities, you can monitor customer interest, create itemized proposals, and follow progress from initial contact to closure.
Properly managing opportunities ensures accurate forecasting, better customer engagement, and smoother conversion into quotations or invoices.
This article explains how to create, configure, and manage opportunities within the Sales Module, including item entry, discounts, and best practices.
Accessing the Opportunities Section
To create or manage opportunities:
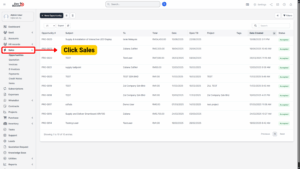
1. From the Main Dashboard, click Sales in the sidebar menu.
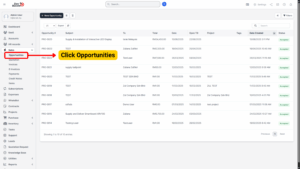
2. Select Opportunities.
3. You will see a list of existing opportunities with details such as subject, related customer, open date, and status.
4. To add a new record, click + New Opportunity.
Creating a New Opportunity
Follow these steps to create a new opportunity:
1. In the Opportunities section, click + New Opportunity.

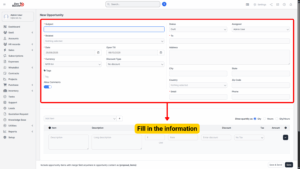
2. Fill in all relevant opportunity details.
Opportunity Details
Each field allows you to customize the opportunity according to customer and deal requirements:
| Field | Description |
|---|---|
| Subject (Required) | Enter a clear title for the opportunity (e.g., “Website Development – ABC Corp”). |
| Related (Required) | Link the opportunity to a customer, lead, or contact. |
| Date (Required) | Select the creation date for the opportunity. |
| Open Till | Set the validity date of the opportunity (e.g., proposal expiry date). |
| Currency (Required) | Choose the transaction currency (e.g., MYR, USD). |
| Discount Type | Select how discounts will be applied: No Discount, Before Tax, or After Tax. |
| Allow Comments | Tick to allow comments and collaboration on the opportunity. |
| Status | Define the current status (Draft, In Progress, Won, Lost). |
| Assigned | Choose the team member responsible for managing the opportunity. |
| To (Required) | Enter the customer’s name or organization. |
| Address / City / State / Country / Zip Code | Record the customer’s full address for documentation. |
| Email (Required) | Provide the customer’s main contact email. |
| Phone | Enter the customer’s contact number. |
Adding Items to the Opportunity
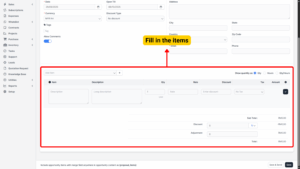
Once customer and opportunity details are set, you can add itemized details:
| Field | Description |
|---|---|
| Item | Select or enter the product/service name. |
| Description | Provide a detailed explanation of the item. |
| Qty | Specify the required quantity. |
| Rate | Enter the unit price for the item. |
| Discount | Apply item-level discounts (if any). |
| Tax | Choose the applicable tax rate. |
| Amount | Auto-calculated: (Qty × Rate) – Discount + Tax. |
The system automatically calculates the Sub-Total.
Applying Discounts and Adjustments
After adding items:
– Apply an Overall Discount (percentage or fixed amount).
– Add any Adjustments (e.g., service fees, special reductions).
The system will recalculate the Grand Total.
Managing Opportunity Details After Creation
Once the opportunity is saved, you can manage it further:
| Action | Description |
|---|---|
| Update Status | Track the progress by updating statuses. |
| Edit Details | Modify customer information, deadlines, or assigned staff. |
| Add Comments | Collaborate with team members by leaving comments. |
| Attach Files | Upload proposals, contracts, or supporting documents. |
| Convert Opportunity | Easily convert opportunities into quotations or invoices when ready. |
Saving the Opportunity
Once all required details are entered:
-
Review the information carefully.
-
Click Save.
The opportunity will now be listed under Opportunities, where it can be monitored, updated, and converted into financial documents as the sales cycle progresses.